
This is part of a book I was asked to write in 2003-2004 about open source software. Unfortunately, the book didn't end up getting published. This particlar section is from a chpater on OpenOffice.org 1.1.0, which is now completely out of date. Nonetheless, there's still some good information here that might be helpful to someone, and I thought this section might be at least of historical interest.
One of the most frustrating tasks that a computer user faces occurs when she must rename several files or folders. By "several," I mean anywhere from five to five thousand. Manually changing a group of filenames is guaranteed to bring about stupor and frustration after about ten entries have been altered. There has to be a better way.
Computers are good at the tedious stuff—that's why we have them, right? So let the computers take care of renaming files and folders! You're in good shape if you use Linux, since there is a great software program that will do just that. Let's take a look.
Windows users have several free tools available to them, but none are open source. THE Rename, packed with features and last released in December 2002, is available at http://www.herve-thouzard.com/therenamea.phtml; Lupas Rename 2000, a simpler program last updated in Au"t 2002, can be found at http://www.geocities.com/lupas2000/; and fnc2003, short for File Name Changer 2003, is available in beta at http://www.sundaysw.com/sw/exe_fnc2003/. Mac OS X users can use R-Name, a free and open source program available from http://www2.mitsuya.nuem.nagoya-u.ac.jp/~tagaya/cocoa/rname_en.html.
Long time Linux users know there is a command available that will help in simple cases:rename. But rename is pretty limited, which means Linux users usually end up creating scripts to do batch renaming of files and folders. These scripts use a variety of languages, including shell scripts, Perl, and Python. Heck, I've written a couple myself. However, it's not exactly easy for newcomers to Linux to write such scripts, so they need a tool that can make things easier.
Fortunately, there's a GUI tool available for Linux that simplifies the process considerably. It's software worth taking a look at if you think you might ever rename, or even change the attributes, of a number of files and folders: KRename.
Installation & configuration
Unfortunately, KRename isn't available yet through APT, so you'll need to (gasp!) install it manually. You can download an installer from http://apps.kde.com (just search for "KRename") or from KRename's home page, at http://www.krename.net. Either way, you're not looking at a big download, only about 200 kb or so. There are binary packages available for Red Hat, Gentoo, SUSE, and Debian, as well as source code. Install as usual for your Linux distro, open the program, and let's proceed to set up KRename.
If you're installing via RPM, and it fails because you don't have libGLcore.so.1, don't worry. The packager using a nVidia graphics card, and his RPM adds nVidia as a dependency. To get around this annoyance, install as follows:rpm -Uhv krename*rpm —nodeps.
Select the Settings menu and then Configure KRename …. In "Look and Feel," you have a choice: either use the wizard-style GUI suitable for beginners, or the tabbed interface for more advanced users. Personally, I think even the tabbed interface is just fine for beginners, so I would make sure that Use tabbed GUI is the one chosen.
The "KRename" group of preferences offer us more choices. Add KRename to konqueror's [sic] context menu is a choice you should definitely select (and be sure to press OK when KRename tells you that it has "Added KRename to your service menu"). Once you have checked that box, you will now be able to right-click on directories or files in the Konqueror file manager and choose "Rename with KRename." KRename will open with the directories or files already chosen and ready to change. Pretty slick.
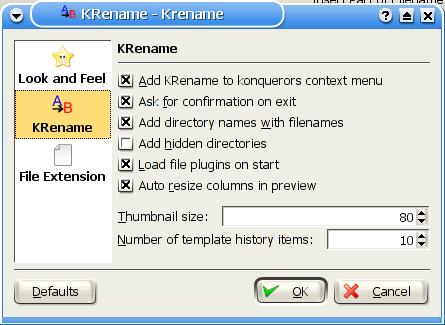
The KRename group of preferences for KRename.
Ask for confirmation on exit is a good idea; you want to be warned if you accidentally close the program, don't you? Add directory names with filenames is another good choice, as it enables you to rename directories as well as files. This can come in tremendously handy at times. Select Add hidden directories only if you need to select items that you keep inside directories named with a dot as the first character, which are thereby hidden. As for me, I usually don't select that option, since I don't need it.
Load file plugins on start will save you time. KRename has a lot of different plugins for a plethora of different file types, and you definitely want them all to load when you open KRename. Another time saver is Auto resize columns in preview, which will adjust columns for you to show as much of a file name as is possible.
The last group of preferences—"File Extension"—should probably also be changed, but it depends on how you name your files. You have three choices: does your file extension—the ".txt" or ".htm," for example—start at the first dot, the last dot, or some other place that you need to specify? In other words, do you never use dots in file names, except for \1he file extension, or do you sometimes use dots in filenames, in addition to \1he file extension? If you have files on your computer with names like "important.file.to.be.saved.txt," then you'd better choose the Last dot option; on the other hand, if you always name files either "important file to be saved.txt" or "important_file_to_be_saved.txt," then you'd be safe choosing First dot or Last dot. Me, I'd select Last dot. Why? Because I know that I'm inconsistent, and I have a few files scattered across my hard drive that have more than one dot in the name, so if I chose First dot, I'd sometimes run into problems. But if I select Last dot, I'm safe, because the last dot is always used for the file extension.
Now that KRename is configured, press OK and let's starting using it.
Some sample uses of KRename
KRename is an incredibly rich application, with over 30 plugins for different file types, and with more coming all the time. When you think about all the different files you can change, and then add in those 30 plugins, you end up with literally hundreds, if not thousands, of permutations.
The best way to really learn the program is to create test directories full of files from a variety of different types (text, jpg, mp3, doc, and so on), and then start using KRename to change the names of those files. Let's walk though some different situations in which KRename can come in handy.
Add the date to a set of pictures
Let's start by changing the file name of a set of pictures. In my case, I'm going to use seven pictures I took of my shih-tzu, Libby, last summer (yes, I'm one of those crazy dog people who dotes on his pet):
- libby by lieberman pool w water.jpg
- libby by pool.jpg
- libby by pool w champagne 1.jpg
- libby by pool w champagne 2.jpg
- libby in arrow rock.jpg
- libby wet by pool.jpg
- libby yawning in arrow rock.jpg
I took all these photos on the same day, and I'd like to add the day's date to the name of each picture, so that they all start with "20030811" (the year, then month, then day) in order to make sorting my vast collection of Libby photos just a bit easier.
To start, open KRename. Notice the four tabs along the top of the window. These are the four steps we're going to go through as we rename our images. In the first tab, Files, add the photos we'd like to alter.
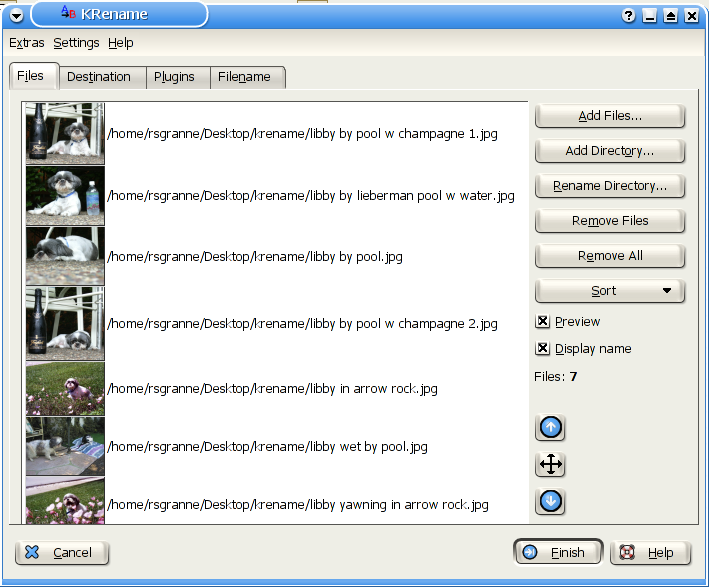
KRename screen 1 enables you to choose which files you'd like to rename.
Add these files by either dragging the ones you'd like to work with from a Konqueror window, or by clicking on one of the buttons along the right side of the window, which are pretty self-explanatory. Since these are photos, I checked the box next to Preview so that I could actually see Libby in all her cuteness.
If the first tab let you specify your input, then the second tab, Destination, lets you determine the nature of your output.
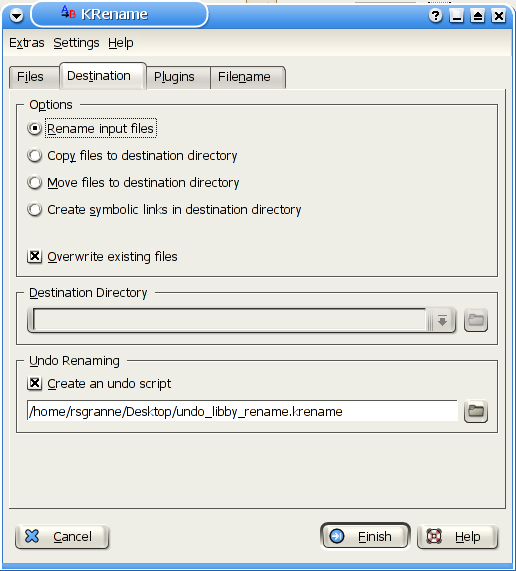
KRename screen 2 lets you specify output.
If you're sure that you wish to actually change the files you're renaming, then select both Rename input files and Overwrite existing files. This can be potentially dangerous! Even if you're really sure that you know what you're doing, you probably should still choose to Create an undo script. Specify a location and a name for the script, and that way you can recover if things don't work out the way you planned.
The second option is safer, and it may be more comfortable for you. Instead of actually changing your original files, you can copy the files to another directory, specified in Destination Directory, and then rename the copied files. Or, if you want the files to end up in a different location, and there get renamed, choose Move files to destination directory. If you just want symbolic (or soft) links to be created in another directory that point to the newly changed files, you can choose that. No matter what you choose, realize that Overwrite existing files does just that: if you copy or move the files into a new destination directory, the copies will overwrite any files that are already there. Be careful and think through what you really want to do before you leave this tab. If you have any doubts at all, create an undo script!
I want to overwrite the actual files with the new names, but since I'm paranoid, I'm going to make it possible to undo my actions. Time to move on to the third tab, Plugins, which may or may not be useful, depending on the changes you intend to make to your files. In my case, I don't need anything offered here, so I'm going to proceed to the last tab, Filename.
Don't worry: we're going to look at the Plugins tab in the following examples, so we'll get plenty of exposure to it!
Filename allows you finalize your changes, but it also enables you to make general changes that supersede the more specific changes that the Plugins tab allows you to make.
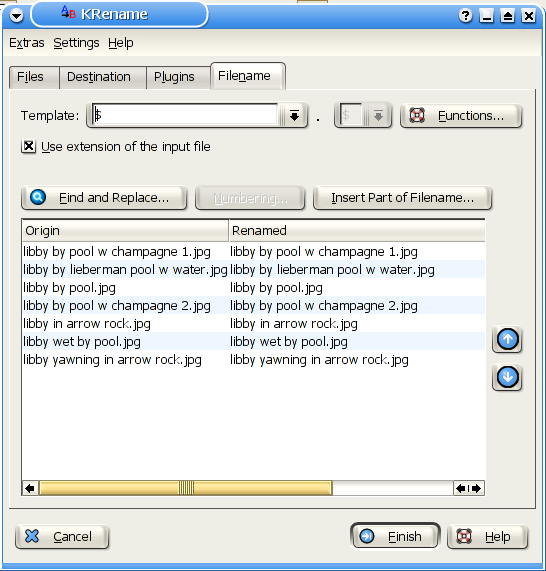
KRename screen 4 enables you to make your final changes.
Notice the Template box at the top of the window. "$" is a kind of variable representing our original filenames. Since all we want to do is insert the date the pictures were taken before the existing names, we simply need to make a change in the Template textbox, and voila! In front of "$," then, type "20030817 " (note the space at the end, after the date, since we want the titles to become "20030817 libby," not "20030817libby," which would be ugly and hard to read). As you type the date in, notice the "Renamed" column in the bottom half of the window. Your changes are echoed there, so you can see what the end results are going to be when you go ahead and commit your changes.
We're not done, though. Sure, we now have the date in the filename, or will in just a moment when we finalize our changes, but I just noticed that these files have spaces in their names. Although most Linux distributions can work with those spaces just fine, spaces can still cause problems in a few programs, especially those based around the command line. It's better to substitute something else for those spaces, and I generally use underscores. So let's also change all the spaces to underscores as well.
To do so, select the Find and Replace … button, which opens a new window.
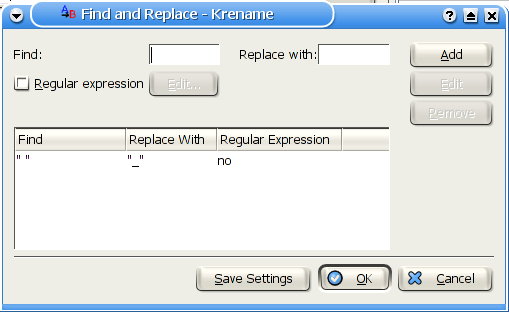
Find and replace in KRename.
In the "Find" box, type a space, and in the "Replace with" box, enter an underscore, and then press the Add button. In the bottom half of the screen, you'll see the change you just requested, listed so you can review it. If you'd like to make additional alterations, type them in, pressing Add each time.
Here's one tip: it's my standard practice to always replace spaces with underscores, no matter what kind of file I'm working with. If you'd like to do the same thing, then enter that in as a find and replace choice, and then press the Save Settings button. After that, when you open this window, replacing spaces with underscores will already be entered for you. Of course, you can remove that choice if you don't wish to use it by selecting it and then pressing the Remove button.
Now that we've entered our simple change, press OK to close the Find and Replace window, and let's go back to the Filename tab. Notice that the "Renamed" column now shows underscores where spaces were previously. Excellent!
You probably noticed that I ignored the Regular expression checkbox. Regular expressions (regex) are an enormous subject, way too large to cover here. If you'd like to use regex in renaming your files, check the box next to Regular expression and press the Edit … button. KDE will present you with its nice regex editor, or you can simply type your algorithm in if you already know exactly what you want. For more information on regex, search Google for "regex tutorial."
It's time to actually rename those files. We're sure that the changes are what we want, so press Finish and watch as KRename does its work in just seconds. A window named Progress opens, letting us know what exactly happened, including the status of the job.
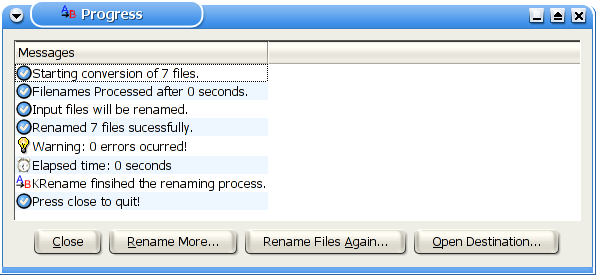
KRename displays the status of the finished job.
It looks like things went well. Before choosing Close, though, which will actually close both this window and KRename itself, take a look at those other buttons. If you're not quite done with the files you were just working on, then you'll want Rename Files Again …; if you instead want to work on other files, you need Rename More …. If you want to see the results of your changes, then press Open Destination … to open Konqueror, displaying those files for your review. No matter what your choice is, congratulations are in order—you've successfully renamed the pictures! Libby would be so happy …
Add the resolution size to a set of sequential pictures
Actually, those pictures of Libby do need a couple more finishing touches. It's great to have the date at the beginning of each filename, as that helps to sort the several hundred pictures in my Libby folder, but it would be really nice to also include the pixel size of each picture in the filename as well, like this: "20030817_libby_by_pool_800_x_600.jpg." That way it will be easier for me to find the large pictures of Libby that are suitable for use as desktop wallpaper. And if I'm looking for a thumbnail image of my dog to stick on my Web site, that will be easier to find as well.
In addition to that, it would also be nice to order the pictures. They were taken in sequence, after all, so they should be put back into sequence, like this: "03_20030817_libby_by_pool_800_x_600.jpg." If I want to use the photos individually, the pixel size helps me pick just the right one, and if I want to scan through the pictures, the sequence number will help me do that. It's a tall order, but KRename can help us do it.
To start, let's repeat the steps we used in the previous example. Select the pictures of Libby we wish to alter and choose our destination on the first two tabs, but stop on the Plugins tab.
![]()
Choosing the JPEG plugin for KRename.
There are two plugins here that look like they could be useful: Picture Plugin and JPEG EXIF Info. The former, while it can work with an impressive variety of image formats, is actually pretty limited, so we'll have to use the latter. Notice how many different types of information we could work with, everything from CreationDate to Exposure to JPEG quality to Dimensions, which is the one in which we're actually interested. Check the box next to Use this plugin, and proceed to the last tab, Filename.
By adding this plugin, what we've actually done is add all of those "Supported tokens" specific to JPEG images as variables that we can place into the template box. To get a better understand of this, press the Functions … button. A new window opens up, and you should see several pre-defined functions listed, all grouped together as "Build in Functions" [sic].
![]()
Built-in functions for KRename.
Think of these as more variables you can add to the template on the Filename tab. For instance, if you want to convert the filenames from lower to upper case, select the &, press Add, and then press Close. On the Filename tab, you would see "$&" in the Template box. get rid of the "$," and you would instantly see that the filenames listed under the "Renamed" column are all transformed to upper case.
We don't want to make our filename all upper case, but we do want to insert numbers in front of the filenames so that the pictures can be seen in sequence. The very first token—the #- looks like our answer. However, if we just choose the # once then our numbering will go from 1 to 2 to 3 and so on. This is OK, but if we're going to have more than ten pictures, we're going to have a problem, since computers sort numbers alphabetically, not numerically, like humans do. We would know that the order should be 1, 2, 3, … 9, 10, 11, 12, but the computer would sort the order as 1, 10, 11, 12, 2, 3, and so on. The solution to that is to use leading zeros, so that our numbers are 01, 02, 03, … 09, 10, 11. That order works for people and for computers, so everyone is happy. In order to get our leading zeros, choose #, press Add, then press Add again. Let's take a look at our results. We're not done, though … not even close.
Our template now says "##$" (if yours says "$##," just delete the "$" and type it after the two pound signs). We've got three problems. A look at the "Renamed" column tells us that the photos will now look something like "0220030817_libby_by_pool.jpg," which means that the two numbers and the date ran together. Easy enough to fix: just put a space between the "$" and the "##" in the template, so it now says "## $," and we've got "02_20030817_libby_by_pool.jpg."
You might be wondering where the underscore between the number and the date came from, since we didn't type that in. Remember when we previously went into Find and Replace … and told KRename to remember that we always want to replace all spaces with underscores? It's still active, and will be until you remove that setting for good. Personally, I'd leave it, as I always use underscores instead of spaces in all filenames.
The next problem is that the numbering starts with 00 instead of 01, as we'd expect. There's that computer thing again. Computers like to start counting from 0 instead of 1, like humans do. This one is easy to fix as well. Just press the Numbering … button and, in the resulting window, change Start index from "0" to "1" and press OK to close the window. Excellent. Now our numbering in fact starts with 01.
But now there's another issue. We're putting the numbers at the beginning of the filename so they can be displayed in order, but the pictures are not really in the right order. They were sorted alphabetically before we added the numbers, and now they're still sorted alphabetically, just with numbers at the start. To rearrange the order of the pictures, so the numbers at the beginning will sort everything in the correct order, use the arrow buttons on the right side of the KRename window to move a selected item up or down in the list. Once I'm done, I have the pictures listed as follows:
- 01_20030817_libby_in_arrow_rock.jpg
- 02_20030817_libby_yawning_in_arrow_rock.jpg
- 03_20030817_libby_by_pool.jpg
- 04_20030817_libby_by_pool_w_champagne_1.jpg
- 05_20030817_libby_by_pool_w_champagne_2.jpg
- 06_20030817_libby_by_lieberman_pool_w_water.jpg
- 07_20030817_libby_wet_by_pool.jpg
But we're still not done, since we now need to add the resolution size to each filename. To do this, we're finally going to make use of the JPEG EXIF plugin we chose on the "Plugins" tab.
Of course, if you wanted to go ahead and make the changes we've been walking through, and then keep working on the same pictures, you could. Just press Finish, and then Rename Files Again … in the following window.
To use the JPEG plugin, press the Functions … button. We were just here, using the built-in functions to add numbers to the file names. This time, however, select "JPEG EXIF Info" from the drop-down menu at the top of the window.
![]()
The JPEG EXIF plugin's functions.
There's quite a long list of possibilities here, but the one we want is "[Dimensions]," so select that one and then press Add, followed by Close. The textbox next to Template in the main KRename window now says "## [Dimensions]$," which is all wrong. One look at the garbled filenames listed under the "Renamed" column is enough to indicate that our template needs some cleaning up.
The problem is that I didn't position my cursor correctly in the Template textbox before I started adding functions. Next time, I need to carefully click after the "$" before I press the Functions … button. My mistake is easy enough to fix, however: I just delete the "$" and move it in front of "[Dimensions]," and all is fine again. My template now says "## $[Dimensions]," and I can continue.
Of course, I want a space between the words of the file names and the dimensions, so I insert a space in my template between the "$" and "[Dimensions]," so my filenames now look like "01_20030817_libby_in_arrow_rock_700_x_483__Pixels.jpg." We're almost there, but that "__Pixels" on the end really bugs me. I don't like it, and I want it gone. Unfortunately, the JPEG plugin puts "__Pixels" in the filename, and I can't change the plugin to tell it not to do that. So I need to use Find and Replace … once again.
It seems pretty easy … just look for "__Pixels" and replace it with nothing. But when we go back to the main window, there's no change. Hmmm … so we see "__Pixels," but it's not really there. Ah! Remember, we're converting all spaces to underscores. Go back to Find and Replace …, remove our previous entry that didn't work, and tell KRename to look for "Pixels" (that's two spaces before the word "Pixels") and replace it with nothing. Press Add and then OK, and let's see if that worked. Yup. Our filenames will now look like this—"01_20030817_libby_in_arrow_rock_700_x_483.jpg"—which is exactly what we want.
It's time to rename those pictures. Press Finish, and then Close if you're finished running KRename. Check out the photos. They're all named exactly as we wanted. If someone wants a slideshow of Libby's activities on Au"t 17th, we're ready, and if someone wants a picture of Libby for their computer's wallpaper with a resolution of exactly 800 x 600, I know just the picture to give him. KRename made it easy.
Change permissions on a group of text files
This next one is pretty easy, but it demonstrates the range of possibilities that KRename offers you. Recently I did a clean install of a new version of Linux on one of my laptops. After the install (which went without a hitch, by the way), I started the process of copying my backed-up data onto the laptop. In my personal bin subdirectory located in my home directory, I keep several small scripts that I've written over the years to perform various tasks.
Shortly after I had restored those scripts to my laptop, I tried to run one of them—named "lowercase"—from the command line, and I got the following message:
bash: ./lowercase: Permission denied
I then realized that the scripts didn't have the execute permissions set. Sure enough, when I right-clicked on the "lowercase" file in Konqueror, chose Properties, and then selected the Permissions tab, I saw the following:
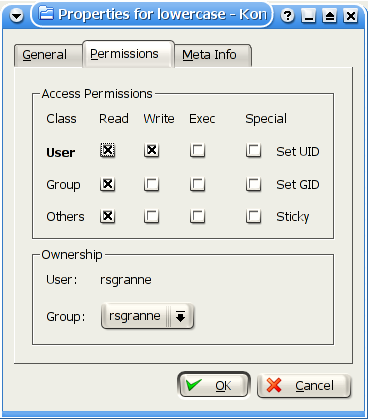
Konqueror shows that I don't have Execute permissions set on the file.
Since the scripts are set to be executable, I can't run them. Now I have to set the permissions for a lot of scripts. Good thing KRename can take care of this for me.
Yes, I know that I could just select all of my scripts in Konqueror, get permissions on them, and set them all to executable at one time. And I also know that I could just type chmod u+x * or even chmod 744 * on the command line, and make them all executable that way as well. But I'm not going to do that, because I'd like to demonstrate the versatility of KRename. But those other methods would certainly work, and work well.
By now, the basic routine should be familiar to you. Select the files we want to change on the Files tab (in this case, my scripts), specify how we want our output and set up an undo script on the Destination tab, and then stop on the Plugins tab to select the necessary plugin.
It's not too hard to find the plugin we want. Second down on the list is the Permissions plugin, exactly the one we want.
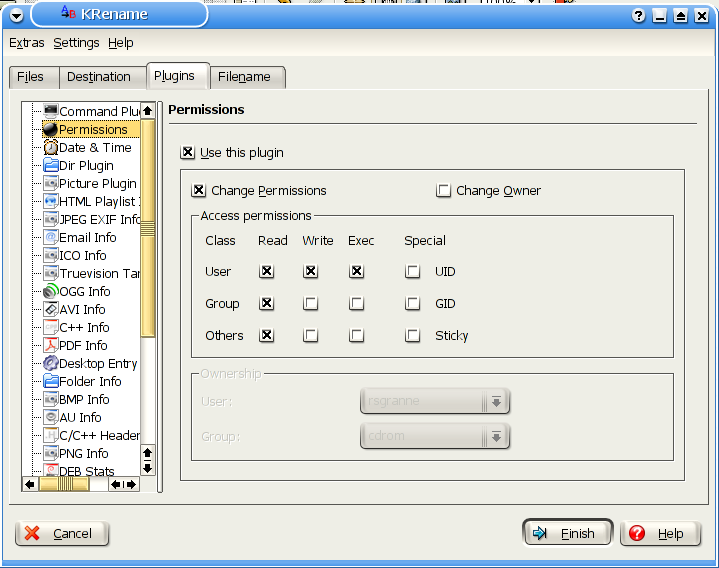
The Permissions plugin for KRename.
In order to actually apply it, we must select the box next to Use this plugin, just as we have with other plugins. Since we want to change to executable, we also need to select the box next to Change Permissions. Once we do that, the choices in the Access permissions area are no longer grayed out and are now available to us to change.
Note that we could also change ownership using this plugin as well.
In order to give me permission to execute the scripts, we need to check the box under Exec in the User row. We could also check the Exec box in the Group row as well, but since I'm the owner and the group, this isn't necessary. If I wanted to let anyone on my computer run the script, then I could check this Exec box in the Others row, but I'm not going to, since I'm the sole user of this laptop.
The boxes in the Special column allow us to make changes that are not common but are sometimes vital. UID and GID stand for "User ID" and "Group ID," respectively. UID means that anyone can execute a file, but the program will run as though the user who owns the file is actually the person running it, while GID means the same thing, except the program runs as though the group who owns the file is running it. In other words, if Jerry is the owner of an executable file named "foobar," and he sets the UID permission on foobar, then another user on the system named Ben can also run foobar, but it will appear to the computer as though Jerry was the person actually executing foobar. Generally, there is not a good reason to use this on your system.
Sticky, however, is different, as it can be extremely useful. Selecting Sticky for a shared directory protects writable files in that directory from being deleted, except by the actual owner of the file. In other words, if you created some files and wanted everyone to have access to them, even be able to change them, but not \1e able to delete them, then you'd want to choose Sticky(or "set the sticky bit," as it's sometimes called). You \1ould still delete them, but no one else could; by the same token, Denise could still delete her own files in that same directory, but you could not (of course, root can still do whatever he wants, regardless of Sticky). Setting Sticky on a file or group of files, however, does nothing in Linux, so don't bother.
In this particular case, I'm not going to select any of the options in the Special column. I've made my changes to Permissions that I need, so it's time to proceed to the Filename tab. There's nothing else I need to do, so press the Finish button. When KRename stops, you can close it. Right-click on the "lowercase" file in Konqueror again, choose Properties, select the Permissions tab, and notice that "lowercase" is now executable. KRename comes through again.
Fix the filenames of oggs you ripped
I really love music. In particular, the great soul crooner Al Green has always been one of my favorites, especially his essential "Greatest Hits" disc. With the rise of digital music in the last several years, it's gotten even easier for me to enjoy "I'm Still In Love With You," "Call Me," and other great classics, whether I'm at my desktop computer, in a coffee shop with my laptop, or walking around with a portable music player.
So far, we've seen KRename work with files in a variety of formats, including text and images. However, KRename will also change music files in the OGG format, which is what I use for all the songs I rip from the CDs I own. Let's find out what we do to a group of OGGs using KRename.
You may be wondering why I don't use the more popular MP3 format for my music. MP3 is a proprietary format for music files that is patented and controlled by the Fraunhofer Gesellschaft and Thomson Consumer Electronics, while OGG is a license-free, open, and patent-free format. Further, OGG files are just as small if not smaller than MP3 files, and to my ears, they sound better. Finally, virtually all audio programs for Linux, Windows, Mac OS X support OGG, and more and more portable music players are adding support as well. Give OGG a try—I think you'll like it. For more information about the OGG format, see http://www.vorbis.com.
I like to use the open source program Grip to convert my CDs into OGGs (Grip probably came with your distribution of Linux; for more about it, go to http://nostatic.org/grip/). If you don't set Grip up right, your OGG files will not have the names that you'd like. For instance, let's say I rip my Al Green CD into OGG files without paying any attention to what I'm doing, and they all end up named like so: "Al_Green_03.ogg," "Al_Green_06.ogg," and "Al_Green_15.ogg." Uh-oh. That's not right at all. Where is the album title? The song titles? Time for KRename.
By now, this should be pretty simple for you if you've been following along. Open KRename, choose the files you want to rename—in this case the OGG files from Al Green's CD—and select how you want to output to work, and then stop at the Plugins tab.
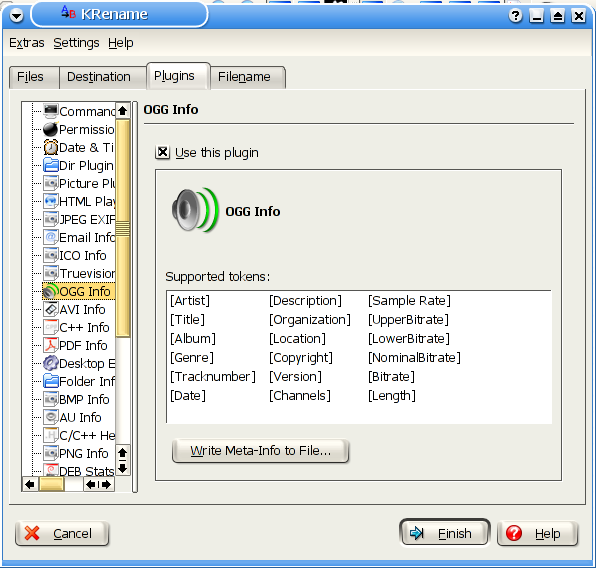
The OGG plugin for KRename.
Since we're renaming a set of OGG files, it's not surprising that we want the OGG Info plugin. Be sure to select Use this plugin, and proceed to the Filename tab, where the real work is done.
To get to the goodies provided by the OGG plugin, press the Functions … button and then choose OGG Info from the dropdown menu at the top of the "Help" window. You should now see quite a list of functions from which we can pick.
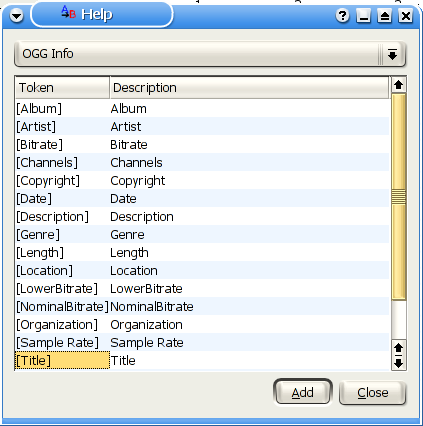
OGG functions we can choose from in order to rename OGG files in KRename.
Since our OGG files are missing the name of the album and the title of each song, we're interested in Album and Title. You can only choose one at a time, so select Album, press Add, select Title, press Add, and finish by pressing Close.
Back on the Filename tab, you should see two new additions to the Template textbox: in addition to the "$," there is now "[Album]" and "[Title]." Our job will be to put those three items in the correct order. I'd like my OGG filenames to look like this: "Artist Name—Album Name—Track Number—Song Title." To get this, all we need to do is move things so that we have this in the template: "$—[Album]—[Title]," which gives us … nope, that's not right. We end up with this: "Al_Green_-_01_-_Greatest_Hits_-_Tired_Of_Being_Alone.ogg." The track number and the album name have to be switched. But how?
If you go back to the functions provided by the OGG Info plugin, you'll find that there is a function called "[Tracknumber]" that sounds like it would work. But when we choose it and insert it into the template, we find filenames like this: "Al_Green_-_01_-_Greatest_Hits_-_1_-_Tired_Of_Being_Alone.ogg." Evidently [Tracknumber] doesn't understand leading zeros, so that instead of "1," it would use "01." So that won't work.
Ah, but we can use another function. The built-in functions offer us the option of inserting numbers, and that function does allow us to use leading zeros. So our template now says "$—[Album]—##—[Title]," and our filenames now look like "Al_Green_-_01_-_Greatest_Hits_-_01_-_Tired_Of_Being_Alone.ogg." Of course, we've got too many track numbers in there. The first "01" is from the original filename, represented by the "$" in the template, while the second "01" comes from our new addition of "##" to the template. Somehow we have to get rid of the first "01," and all of the other existing track numbers as well, but it's in the original file name, so how do we get it out?
The secret arrives by pressing the Insert Part of Filename … button. This allows us to insert a part of the existing filename back into our template.
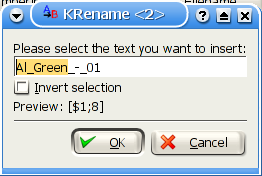
Inserting part of an original filename back into the template in KRename.
In our case, we want to pull the "Al_Green" part out of the original filename and use it in the template. Select "Al_Green" and notice the preview function that is generated: "[$1;8]." In this case, that means to start at the 1st character of the filename and then choose the next 8 characters, which is exactly the length of "Al_Green." Press OK and let's see what the results will be.
Our template now says "[$1;8]$—[Album]—##" and the filenames will look like "Al_GreenAl_Green_-_01_-_Greatest_Hits_-_01_-_Tired_Of_Being_Alone.ogg," which is a problem. The first "Al_Green" is from our new function, [$1;8], while the second "Al_Green" and the first track number are from the "$."
The solution is clear: remove the "$". When we do that, our template is now "[$1;8]—[Album]—##—[Title]" and our song will now become "Al_Green_-_Greatest_Hits_-_01_-_Tired_Of_Being_Alone.ogg," which is exactly what we want.
Sharp-eyed readers will notice that I could have just deleted the "$" from the get-go and simply inserted the words "Al Green" at the beginning of the template. This certainly would have worked, but then how would you have learned about the Insert Part of Filename function?
To complete our work, press Finish and then close KRename. Fire up XMMS (http://www.xmms.org), the best audio player for Linux, and enjoy the smooth sounds of Mr. Al Green. You deserve it.
Further information about KRename
The home page for KRename can be found at http://www.krename.net. There you can find the latest news about the program, downloads of stable and beta releases, a very nice set of screenshots, support via a mailing list or a forum or even an IRC channel, contact info for the developers, and even a link for donations, should you feel so inclined (and you should—these guys have written a very nice program, and they deserve some money).
Additional information can be found at http://sourceforge.net/projects/krename. There's not a lot there, but there is a complete collection of downloads, available at http://sourceforge.net/project/showfiles.php?group_id=42805. Make sure you download the correct version of KRename that corresponds with your version of KDE and your distribution of Linux. For most people, you'll want to scroll down the page to the "KDE3 krename-stable" section and look there.
Summary
Another one of those gotta-have utilities is a good batch renamer. Spend some time playing with KRename. It's truly a Swiss Army Knife of a program, with literally thousands of possibilities available. And don't forget to upgrade it whenever you can, as new plugins and features are being added all the time. It's not a program that you'll need every day, but when you need it, you'll be glad that you have KRename available to you. And frankly, isn't that one of the definitions of a good utility: a program that comes in handy when you need it?