
On this page…
This is a part of a chapter from a book that never saw the light of day, since the publisher killed it before I could finish. Some of this info is out of date, but I thought I'd give it to the Net in case someone found it useful.
Introduction
Although tape drives are still used in a lot of organizations for backups, they're not nearly as popular as they once were, and for good reason. Since tapes are reused over and over, someone has to develop and keep track of a rotation process, so that tape A is used on every fourth Thursday, and tape G is used on the second Monday of every odd-numbered month, and so on. In addition, it can be time consuming and difficult to restore data from a tape when all you need is one file. Finally, tapes are an analog medium, so they eventually wear out after a tape head rolls over the tape enough times.
It's not tremendously hard to burn CD-RWs from the command line, but it's certainly easier to use a nice GUI, and K3b is easily the best CD burning GUI available for Linux, perhaps even on any platform.
This might be obvious, but K3b won't work unless you have a CD-R/RW device installed on your system. Make sure you've got that hardware installed and working before proceeding through the rest of this section. If you need help getting your CD-R/RW hardware to work, take a look at the CD-Writing HOWTO, found at http://www.tldp.org/HOWTO/CD-Writing-HOWTO.html.
Installation & configuration
Currently, K3b isn't included with a lot of Linux distributions, but this might change as more and more Linux users discover how great K3b is and start requesting it in their favorite distros. Fortunately for those of us who have to install K3b on our system, it's not a hard process at all.
If you're using Debian, or a Debian-based system, it's simply a matter of using APT to request and install the software:apt-get install k3b. Heck, if you've installed APT for Red Hat, then try running the same command. In just a few minutes, K3b will be installed on your computer. Gotta love APT!
If you don't have APT on your machine, or if you just like doing things the hard way, then download K3b from the official Web site, at http://www.k3b.org. There you can find installers for a variety of distros, including Red Hat, Fedora Core, Slackware, Mandrake, Debian, and SUSE. After you get the RPM, or DEB, or .TAR.GZ file, install it as you normally do on your computer.
If an icon for K3b doesn't appear on your KDE or GNOME "start" menu, then don't forget to add it. Make sure it points to K3b's location on your system, which is usually
/usr/bin/k3b. If you'd rather start K3b from the command line, just typek3band you're good to go.
Before continuing, though, we need to make sure some other components are installed that K3b needs in order to run.
cdrdao, cdrecord, and mkisofs were probably installed when you first set up your system, but if you didn't get them, just use APT, like so:apt-get install cdrdao cdrecord mkisofs.
You need the transcode package if you plan to encode audio and video from DVD or AVI files. In essence, transcode converts video formats into other video formats. If you're using Debian, SUSE, or Red Hat, then apt-get install transcode should fix things. Likewise, if you plan to create SVCDs (Super Video CDs), don't forget to run apt-get install vcdimager.
Much like transcode, sox translates sound files from one format into another, including OGG, WAV, MP3, and AIFF. To get sox,apt-get install sox. To further your enjoyment of burned sound files, install normalize, which adjusts the volume of WAV files to a standard level, with apt-get install normalize.
If you have a DVD burner and want to use K3b with it, you'll need dvd+rw-tools. Most Linux users can use apt-get install dvd+rw-tools to get what they need.
Finally, if you plan to burn video CDs that will boot and automatically play, then you'll need eMoviX installed as well. You can find out more about it at http://movix.sourceforge.net/.
Setup
Before you can start using K3b, you need to set it up to run on your system. This is a very important requirement, and in fact, you can't run K3b without first setting everything up.
Prior versions had an actual setup program that you had to run, but now setup is supposed to be part of the KDE Control Center. To get to it, open your KDE Control Center, expand System Administration, and then choose K3bSetup 2. However, you may not find it there; if so, open K3b. It may, if this is the first time you've run K3b, go ahead and prompt you to open K3b Setup. If it doesn't, then once K3b loads, select the Settings menu and then K3b Setup. Different versions of K3b on different Linux distros act differently with regard to the Setup program; hopefully this will all be ironed out as K3b continues to mature.
K3b's setup.
You probably don't want to check the box next to Use burning group. As K3b's help explains, "If this option is checked, only the users in the specified group will be able to burn CDs and DVDs … Otherwise all users on the system have access to the devices and to all K3b functionality." Besides, I've noticed that on my Debian machine, checking the box did nothing anyway; it did, however, work on my Red Hat box. Since most people don't mind if everyone on their computer can use their burner, I don't think this box will get checked by many folks.
Make sure that K3b can find your CD or DVD burner in the Devices section. Normally, K3b should be able to find it without your intervention and it will just appear. If it doesn't, press the Add Device button and enter a path pointing to your burner. This command can help you narrow it down, if your Linux distro detected your CD-RW when you were installing the operating system:
ls -l /dev/cd*
If that doesn't help, you may want to consult some of the resources I mention at the end of this chapter.
Finally, make sure in the External Programs area that K3b has permissions set correctly for the programs it needs to burn CDs and DVDs. To be honest, what K3b thinks it needs and what works are sometimes two separate things. If you open the Setup program and your CD-RW is detected, you may want to consider just clicking Cancel to close it and then seeing if K3b works. If it doesn't burn CDs correctly, then go back to the Setup program and see if changing permissions in the External Programs section works. In my experience, I've had very few problems getting K3b set up to work with my hardware.
Configuration
Now let's configure K3b. Before we get started, let me emphasize that I'm only going to suggest a few changes. For most people, the default settings that K3b ships with are fine. I'm going to make a few suggestions that I think help to improve things. Beyond that, you really have to know your stuff about CD burning if you're going to start changing the basic settings.
If you'd like to learn more about CD-RWs and ISOs and DVD+RW and the rest of that alphabet soup, then look at the end of this chapter, in the "Further information about K3b" section.
To configure K3b, select the Settings menu, and then Configure K3b. On the left side of the Options window, choose Devices.

Making sure that K3b sees your CD/DVD drives.
You need to make sure here that K3b sees your hardware. If you just have one drive, and it's a CD-R/W, then don't panic if K3b doesn't list a Reader and instead lists only a Writer. Remember, if it's a writer, it can also read. If you have two drives, then K3b will list them both, as a Reader and a Writer or, if you're one of those lucky folks, a Writer and another Writer.
If K3b for some reason does not see your hardware, then press the Add Device button and enter the path that K3b should use when it searches for your CD-R/W. By default, K3b suggests /dev/, and this should be correct. If K3b still can't find your burner, then you need to examine your hardware and make sure that things are connected correctly. Look at the "Further information about K3b" section at the end of this chapter for some suggestions.
On the left side of the Options window, select Programs.
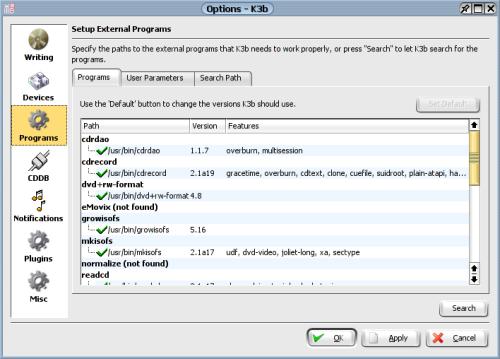
The list of programs that K3b has found and can use.
Remember all those programs we installed earlier? Here's where we see the results. If K3b sees a program it needs, it shows up here. To absolutely work as a CD-burning program for data and music, K3b needs cdrdao, cdrecord, mkisofs, and readcd; all the others serve more specialized purposes and are needed only if you have a certain need. If you don't see a program that you need, then close K3b, install the program, and open K3b back up again.
Now select Notifications on the left side of the Options window.
Turning notification sounds off (or on) in K3b.
When K3b finishes burning a CD, the program plays the triumphant "charge!" sound; likewise, if there are errors, K3b plays the "sad sack" noise. Some people find these incredibly annoying. If you don't like these noises, select each event at the top of the screen and then uncheck the box next to Play a sound. If you would like different noises to play, click the Open file dialog button on the far right on Play a sound, find the sound you like, and choose it. If you want other notifications—programs to open, dialog boxes to pop up, and so on—press the More Options button and make your changes. Then choose the Misc button on the left side of the window for our last bit of configuration.
Setting miscellaneous options for K3b.
I wouldn't bother changing the settings on this page, but you should know about the very first one on the screen, as it may save you some trouble. You should change Default Temporary Directory if you don't have enough space in /tmp for the files that K3b will generate and then discard when burning CDs and DVDs. By default, K3b wants to use /tmp/kde-username, but you can change this if necessary. Remember, if you're just burning CDs, you'll need around 700 MB of empty space; if you're burning DVDs, K3b could require gigabytes of free space, so adjust accordingly.
K3b is hereby configured. Time to burn.
Backup files
Backing up files is actually an incredibly simple process with K3b. In fact, it's so simple that you now have absolutely no excuse for not regularly backing up your important data onto a CD.
Let's start by opening K3b, either from the launch menu or from the command line by typing k3b.

K3b's main window.
K3b is divided into two main areas: a file and folder navigation area in the top half of the window, and a project view in the bottom half. K3b makes it really easy to get started by providing buttons for the four most common tasks in the project view. Since we want to burn a data CD for backup, start by choosing Create Data CD Project. When you do, the project view area changes.
Creating a Data CD Project in K3b.
The project half of K3b becomes an empty vessel for your data files. In my case, I want to burn some MP3 and OGG files (yeah yeah yeah, shove it, RIAA—I own the CDs). In the navigation area at the top of K3b, I drill down to the "mydata" folder that contains the various subfolders that hold within them the albums and singles that I like to listen to while I'm working on my laptop. I'd like to backup some British alternative acts, so I click on "Madness" in the navigation view and drag it down onto my project in the bottom half of the window. K3b instantly tallies up the space that the "Madness" folder will take and displays it as a bar graph in the bottom of the window. I know I want both "Smiths" and "Stone_Roses," so I click on the first, hold down the Control key while selecting the second, and drag both down to my project. So far, so good—only 501 MB used.
I have plenty of space, so I also add "Catherine_Wheel" and "My_Bloody_Valentine" and "Coldplay" and … oops!
K3b indicates when you've added too much data for your CD.
My CD-R is 700 MB, and the addition of Coldplay pushed my data total over 725 MB. I've left the green zone of comfort, shot through the yellow "caution" zone (every burned CD needs a few megabytes for a table of contents and other necessities, so K3b warns you when you're starting to encroach on that space), and ended up in the red danger zone. Something's gotta go.
To remove something from your project, right-click on it and choose Remove, or left-click on it to select it and then press your Delete key. It will only remove the files from your project; your actual data files are still safe and sound. When I remove "Coldplay," I'm down to 604 MB, so I still have some space. How about adding "Radiohead"? That pushes me back to 710 MB. OK, "Catherine_Wheel," you have to go. That gets me to about 652 MB, which means I'm wasting a bit of space, but not more than I can live with. I'm happy with the files I want to back up, so I press the Burn button located in the bottom right of the K3b window.
When I do, a new window opens up:Data Project. This is an extremely important window, as it allows me to tell K3b exactly how I want to burn my CD. There are a lot of choices to make here, and the wrong one can mean the difference between a successful backup and a shiny hunk of plastic.
Don't forget that K3b has really informative built-in help. If you're unsure about an option, just click on the What's This button (the one that looks like a question mark) in the upper right of the window, and then select the option in the window about which you'd like more information.
The Writing tab of the K3b Data Project window.
The first thing to set is the speed at which you're going to burn your CD. If you leave Speed set to Auto, then K3b will try to burn at maximum speed. This may or may not work. In my own experience, and those of many others, it's a good idea to slow down and burn at a slower speed in order to insure that the burn is not problematic, no matter what software you use. If you have the time and patience, 4x is slow and steady and almost always works. Granted, it will take about 15 minutes or so to burn a full 700 MB disc, but I'm usually doing something else anyway while I'm burning, so it's not a big deal. If you're not as patient, then start out fast, test your results, and be prepared to slow things down gradually, always testing after each burn until you find the optimum speed for your hardware and your media.
Ã≠ If you just want to create an ISO without proceeding to burn that ISO to a CD, check Only create image. K3b will then ask you where you want that image to go, and also let you know if you have enough space on your hard drive to hold it. This can be really handy if you want to create an ISO that you intend to burn multiple copies of, perhaps over a period of time. Note that if you do choose Only create image, all the other options in this section will gray out so you can't choose them, which makes sense.
Ã≠ If you leave On the fly selected, then K3b will do just that: write the files directly to the CD-R/W without first creating an ISO image. If your hardware is fast enough, this should be no problem. If your hardware is slow, however, or if you're experiencing problems burning, try unchecking On the fly. K3b will first create an ISO image of your data, and then burn that ISO image to disc, a process that takes longer but is more likely to result in a good burn. If you do uncheck On the fly, you may or may not want to also check Remove image. If you check Remove image, then K3b will erase the ISO it created once it has successfully burned it to disc; if you don't check it, then you'll be left with an ISO image that you can save and use later for other burns, or even post on the Net for others to download and use.
It's always a good idea to select Verify written data, as this will compare what was burned to the original data, and thereby let you know if something didn't work correctly. Finally, if you just want to test things and not actually burn a disc, check the box next to Simulate. K3b will go through the entire process but leave the laser off, which may alert you to problems before they occur.
Before going on to the next tab, notice the three buttons along the bottom of the window, which in fact are at the bottom of every tab in this window. If you get the Writing tab set up just the way you like, and you think that you'll probably use those settings on most jobs, then go ahead and press Save User Defaults to preserve your choices. Next time you start to burn a CD, K3b will load those settings and use them. If you set things up and then start playing around, changing everything, and then decide that you want to go back to the options you saved, press User Defaults, which reloads your default settings (a better name for that button would be Load User Defaults, in fact). Finally, if you decide that you want to start completely from scratch again, press K3b Defaults, which takes everything back to its original state. There's one caveat, however:Save User Defaults has to be pressed for each tab. In other words, set things the way you want them on the Writing tab, and then press Save User Defaults; then repeat the process on the Settings tab, the Volume Desc tab, and so on.
Let's proceed to the Settings tab.
Setting the kind of session we're using in K3b.
You only need to change your settings in the Multisession section if you are planning to add content to your CD over several different burning sessions. Most of the time, I'm filling a CD completely, so I want the default:No multisession. But let's say you're planning to burn 200 MB now, and then 150 MB later, and then one more batch of 300 MB of data. When you burned the first 200 MB, you'd select Start multisession, which tells K3b not to "close" the disc and prevent further burning. For the next 150 MB, you'd choose Continue multisession, and then you'd end the last 300 MB with Finishmultisession, which would tell K3b that it's alright to go ahead and close the disc. Since we're backing up files and have no plans to add more to this CD-R, I leave things set to No multisession and continue on to the Volume Desc tab.
Describing the disc we're burning in K3b.
None of the information on the Volume Desc tab will prevent a successful burn, but you'll probably want to spend a moment here just so things are organized and clear. In other words, this tab really isn't for the computer—it's for the human, you!
First, use Volume name to describe your disc effectively. You can use up to 32 characters, including spaces, but I would avoid special characters—like / oror :—that might cause problems with various operating systems. Remember that this is the name Linux will display when it mounts your CD, so use something that will make sense to anyone who may use the disc.
If this particular disc is part of a set or series, then fill in the Volume set name with something that describes the entire series. If I were burning all of my British Alternative music to disc, not just The Smiths and My Bloody Valentine, I might use that as my Volume set name: "UK Alternative." Whatever makes sense.
If I know that my UK Alternative set is going to take up 5 CDs once I back it all up, then I could change Volume set size to 5. However, I usually have no idea how many discs it's going to take for a set, so I usually ignore that setting.Volume set number is a bit easier to figure out—is this the first disc? Second? Third? And so on.
Change the Publisher to your name, or your company's name, or nothing at all. You could include some sort of identifying information in case someone wanted to get hold of you, like an email address or a phone number. No matter what you choose, you get up to 128 characters, including spaces.
If your organization is the Publisher, perhaps you could put your name in as the Preparer. By default, K3b lists itself as the Preparer, which is no big deal. Anyway, it lets people that check that sort of meta-data know what CD burning program you think is good, so it's free advertising for K3b and Linux, which is never a bad thing. Just like Publisher, you get 128 characters.
System is where you can list your operating system, so feel free to wave your freak flag high, as Jimi Hendrix said, and go with K3b's default of "LINUX." Heck, you get up to 32 characters, so why not "Linux—Best OS in the world!" The same idea applies for Application, where you get up to 128 characters to describe the program used to create your disc. K3b already fills in quite a bit, but you can change it if you'd like.
Have fun with this tab. Remember, none of it will affect the burn technically, but it can make using the CDs later a lot easier.
Make your changes, and select the Filesystem tab.
Tell K3b what kind of filesystem you want to place on your new CD.
This is a really important tab, especially if you want to make sure your disc can be used on both Linux and other operating systems. For backups, this may be a pretty important consideration. If you never have to touch a Windows machine ever (you lucky so-and-so!), then this tab may not be as important to you, although there are still things here that you will probably want to set.
Checking those boxes in the File Systems section is key if you're after cross-platform compatibility. When I first began burning CDs of my OGG files, I quickly ran into an annoying limitation. I was trying to burn a series of OGG files with long names, such as "The Rolling Stones—Beggar's Banquet—06—Street Fighting Man.ogg" and "The Flaming Lips—The Soft Bulletin—02—A Spoonful Weighs A Ton.ogg." When the burn finished, I ended up with "The Rolling Stones—Beggar's Banquet—06—Street Fighting Man" and "The Flaming Lips—The Soft Bulletin—02—A Spoonful Weighs A ." If you count carefully, you'll notice that the filenames are truncated after 64 characters, which was a problem for two reasons. First, it misrepresented the actual name of the file, which was just annoying, and second, it chopped off the extension, so the file wouldn't play on my Windows box.
This was occurring because there is a wide variety of standards for CDs, and, in typical fashion in the computer world, they don't always agree. For instance, when you burn a CD, you can stick to ISO9660 standards, but all filenames must be in all capital letters, and they have to be a maximum of eight characters, plus the period and the extension. DOS, anyone? You can also use the Rock Ridge extensions, which allow UNIX systems (including Linux and Mac OS X) to read CDs that contain files with names of up to 255 characters, as well as support UNIX-y things like owners, groups, permissions, and symbolic links. However, Windows does not support Rock Ridge ($50 billion and 30,000 employees, and Microsoft can't support Rock Ridge? Riiiiight.), so don't use it as your only file system if you want to access your data on that operating system.
"Rock Ridge" is the name of the town that the sheriff saves in Mel Brooks' immortal Blazing Saddles. Its use as the name for UNIX extensions to the ISO9660 standard is just another bit of nerd humor.
If you want to make sure that Windows users can read the content of your discs, you should enable Joliet extensions, which supports up to 64 characters in filenames (although there are ways around this, as you'll shortly see). Users of Linux and Mac OS X can also read CDs that use Joliet, but Mac OS 9 and earlier will truncate file names at 31 characters, a major limitation of pre-OS X Macs.
UDF, which stands for Universal Disk Format, is mainly used for DVDs, but CD-R/Ws can also use it. It allows for 127-character filenames, including spaces. The idea is that you'll be able to write to CDs and DVDs just like you write to floppies, USB drives, or hard drives: just drag and drop. For UDF to work, though, you need very recent hardware and special drivers if you're using Windows or Mac OS (most Linux distros now include support for UDF-based discs). If you're shooting for wide compatibility, you probably should avoid UDF at this time.
Now that we understand these different file systems, our choices on the Filesystem tab in K3b start to make more sense. If you really want CDs that every OS can read, then make sure that nothing is checked in the File Systems section, and you now have yourself a CD that adheres to the ISO9660 standard. Of course, all your files are going to look like this—FAKEPLAS.MPG, MYIRONLU.OGG, and BLACKSTA.MP3—but you will \1e able to use them on just about any computer with a CD-ROM. But still …blecch.
If your disc is only going to be used on Linux machines (or Linux and Mac OS X), then just check Generate Rock Ridge extensions. Windows won't be able to read it, but who cares? If you do use Rock Ridge, but you don't want symbolic (or "soft") links included on your burn, then check Discard all symlinks. If you are concerned about including soft links, but you want to make sure that you don't accidentally include links to files that aren't included in your burn project, make sure that you check Discard broken symlinks.
Also remember that if you're using Rock Ridge, you can tell K3b to include information about file permissions along with the burn. To do this, check Preserve file permissions (backup). As the name implies, this creates an exact backup of your files—not just the data, but the meta-information about who owns it and what they can do with it.
If you want to include Windows machines in your burn, then check both Generate Rock Ridge extensions and Generate Joliet extensions. Your Linux machines will see files of up to 255 characters, while Windows will see files truncated to 64 characters … unless you check a box on the next tab, which I'll get to in just a moment.
The options in the Whitespace Treatment can be useful if you want to get rid of spaces in the filenames on your disc.No change does just that—files that have spaces in their names still do. Nowadays, this isn't really a problem for Linux boxes, so I just usually leave K3b set to that. If, though, you'd like to remove all spaces and smoosh together any words used in a filename, select Strip, which would change a file called "My really big file.txt" to "Myreallybigfile.txt"on the CD \1the filename on your hard drive would remain as it was, with spaces). Choosing Extended Strip smooshes together all the words, but it also capitalizes each word that is smooshed together, so that "My really big file.txt" would be burned as "MyReallyBigFile.txt." Finally,Replace with is perhaps the best choice if you want to get rid of spaces. Just choose it, and then enter an underscore in the textbox, and "My really big file.txt" becomes "My_really_big_file.txt," which I find both readable and happily space-less.
I sort of lied in the last several paragraphs as I discussed ISO9660, Rock Ridge, and Joliet (sorry). Things aren't quite as hard and fast as I made them seem to be, but such is the world of CD burning. Over the years, Rock Ridge and Joliet were added on to the ISO9660 standard to allow for things that people wanted that the original standard didn't provide—like the ability to get beyond FILENAME.TXT for instance. But different extensions have been added on to the Rock Ridge and Joliet extensions, and ISO9660 has itself morphed into different versions. Fortunately, most modern hardware and modern operating systems support most of these addons and extensions, but it's still a good policy to test all burned CDs on the various CD readers that you plan to use before \1ou rely on those discs! I'd hate to see you make backups of your vital data onto CD, intending to transfer the data to a different machine, only to find out that the different computer can't read your discs after you've repurposed the original box. As the guy who copies my house keys always says, "Test before you trust." Wiser words were seldom spoken.
With that warning in mind, let's take a look at the last tab,Advanced, which allows us to make these changes to the basic CD-R/W filesystems.
Change the basic CD-R/W filesystems in K3b.
I've spoken several times earlier about getting beyond the 64-character limit for the Joliet extension. Here it is—just check Allow 103 character Joliet filenames, and you almost double your allowed filename length on Windows machines. Does this break the official Joliet standard? Yup. Does it appear to work anyway in Windows? Yup. I say, go for it (but remember to test first). Remember—you can get up to 255 characters in your filenames using Rock Ridge, but only 103 characters using Joliet. Still, for all but the looooongest of filenames, 103 characters should suffice (although not if you're burning "The Flaming Lips—Clouds Taste Metallic—06—Guy Who Got a Headache and Accidentally Saves the World.ogg," but such is life … and The Flaming Lips).
Next is Allow untranslated filenames. Notice that under this option are nine indented suboptions. By checking Allow untranslated filenames, you are in essence activating eight of those nine suboptions—weirdly, you must enable Allow max length filenames (37 characters) if you want it, as that option is not included by choosing the parent option. In essence, checking either Allow untranslated filenames or any of its suboptions breaks the ISO9660 standard. Frankly, I'd recommend just going ahead and selecting Allow untranslated filenames; in for a penny, in for a pound, as they say. Realize that your CD will not play in MS-DOS, but really, how concerned about that are you? I've burned countless discs with that option on, and I've never had a problem in either Linux or Windows playing back those CDs. Your mileage may vary, though.
A couple of notes on some of those suboptions. If you've already chosen Rock Ridge or Joliet extensions, then it's not going to matter that you choose Allow 31 character filenames or Allow max length filenames (37 characters), since you've already given yourself the freedom to use either 255 or 64 characters (and 103 characters in Joliet if you allow that). Finally, although the text of most suboptions are pretty self-explanatory, I did want to point out what Omit version numbers means. The ISO9660 standard states that filenames should be followed by a semicolon and then a file version number, so that "filename.txt" gets burned as "FILENAME.TXT;1" (ugly, ain't it?). Most operating systems automatically hide the version numbers when they display files (really old Macs are an exception), and no one really uses version numbers anyway, so don't feel too bad about getting rid of them. You can choose that option individually, or just select Allow untranslated filenames and take care of it in one fell swoop.
TRANS.TBL files translate long filenames into their 8.3 equivalents, so that what appears to a Rock Ridge- or Joliet-aware computer as "The Smiths—Meat Is Murder—06—How Soon Is Now.ogg" shows up on a non-aware machine as "THESMITH.OGG." Hey, it allows for compatibility, that's for sure. Do you need to worry about this? Probably not, so I wouldn't bother checking Create TRANS.TBL files. And I would definitely check Hide TRANS.TBL files in Joliet, since the presence of those files would just confuse Windows users.
If you're using the Rock Ridge extensions, then you really don't need to select Follow symbolic links, as Rock Ridge already allows for this. But if you're not using Rock Ridge, yet you want soft links to work on your burned CD, then check Follow symbolic links. Why you want to enable soft links but not use Rock Ridge is beyond me, but it's possible.
You may select an ISO Level, but, to be honest, if you've decided to enable Rock Ridge or Joliet, then just leave K3b's default setting of Level 2 in place. You've already broken strict ISO9660 compliance, so don't worry about it.
The Input Charset section allow you to specify what language character set you're using in your filenames. If you don't specify anything, K3b uses the default of ISO-8859-1, which covers Western European languages, like the one you're using to read this book. If you're using different characters in your filenames, like Russian, Asian, or Hebrew for instance, you're going to need to specify the character set you need by checking Force input charset and then choosing from the dropdown menu. If the option you want to use isn't listed (UTF-8 isn't there, for instance), you can manually enter it.
We've spent a lot of time looking at these options, but fortunately you only need to worry about this stuff every once in a while. Remember, you can save your settings as K3b's defaults by pressing the Save User Defaults button on the bottom of each tab. Then, the next time you open K3b, all of your settings are good to go.
OK, it's time to burn. Press the Burn button in the upper right of the window. Depending on the speed of your burner and the speed you've chosen for your burn, you'll shortly be done. While K3b works, it displays a progress bar showing you what it's doing and how far it has progressed. If you get an error, take a look at the info that K3b gives you, as it can help diagnose the problem. In my case, my backup of my British alternative tunes burned fine, so I'm off to listen to some Smiths and drink a toast in honor of Morissey and Johnny Marr.
Burn ISO images
Since you're reading this book, I would be willing to bet that you've familiar with downloading and burning ISO images of Linux distributions. If you're a member of the tribe of Penguins, then you've either burned an ISO, or you will at some time. K3b makes this process painless.
There's an easy way to burn ISO images, but that's not enough. No, K3b offers you an easy way to burn an ISO, and an even easier way to do it! Let's look at the, uh, harder easy way first.
Before we can burn an ISO, you need to have an ISO image. If you don't have any handy, let me recommend that you download Knoppix, which would be a good way to prepare for chapter five. To download the latest ISO of Knoppix, head over to http://www.knoppix.net/get.php, and download the latest ISO via FTP, HTTP, or BitTorrent. Be forewarned: this is close to a 700 MB download, so don't try this unless you have suitable bandwidth (translation: forget it, modem users).
My friend Robert Citek taught me a good trick a few years ago for laptop users: as root, create a directory in /var called iso, and then set permissions so that anyone on your system can read and write to it, like this:
chmod 777 /var/iso
Now you have a nice repository for any ISOs that you want to download and carry around as you spread the Linux gospel by handing out copies of Knoppix, Fedora Core, or what have you.
Download your Knoppix ISO into /var/iso, or wherever else you'd like. Once you have it, let's burn it onto a CD. Insert your blank 700 MB CD-R (it must be 700 MB, since that's the size of the Knoppix ISO) and then open K3b. Click on the Tools menu, and then CD, and finally Burn CD ISO Image.
Preparing to burn an ISO image with K3b.
As soon as the Burn Iso9660 Image window opens, select the ISO image you want to use by clicking the open folder icon in the Image to Burn section. Navigate to the ISO image (again, mine is in /var/iso) and select it, pressing OK to bring you back to this window.
Immediately K3b will begin validating the Md5 checksum of the ISO. If you're concerned that the ISO may have been tampered with by an "evildoer," then compare the checksum reported by K3b with the checksum on the Web site from which you acquired Knoppix. You don't need to wait for K3b to finish checking the Md5 sum before you start the burn, however.
Make sure that K3b is going to use the correct burning device, and at the correct speed. You really don't need to change anything else, unless you just want to test the burn without actually performing it, in which case you should check the box next to Simulate. When you're ready to do the deed, press the Start button. In just a few minutes, depending upon the speed of your hardware and your media, K3b will finish, and you'll have a brand new shiny copy of Knoppix to play with or hand out to friends and acquaintances.
Now, that was the easy way to burn an ISO, but there's an even easier way to do the same thing. Of course, this second method only works if you're in KDE, while the first method works in KDE, or GNOME, or any window manager.
You don't even need to have K3b open. Just navigate in Konqueror to the directory holding the ISO image and right-click on the ISO. In the context menu that opens up, choose Write CD Image with K3b. Automagically, K3b will open, with the ISO already chosen and ready to go. Make sure your device and speed is correct, press Start, and away we go.
Now if we could just think \1n our mind, "K3b, burn that ISO in /var/iso," and have it accomplished, the ultimate in ease of use would be achieved. Actually, I heard a rumor that Linus is going to add telekinesis to the next kernel, so maybe it'll happen!
Further information about K3b
The first place to go for information about K3b is the project's home page, at http://www.k3b.org. There's not a lot there, unfortunately, but you might find something useful, such as the latest news about software releases. However, the mailing list, found at http://sourceforge.net/mailarchive/forum.php?forum_id=1927, is currently averaging a couple of hundred emails a month, so you might be able to find help there, maybe even from Sebastian Trueg, the creator and maintainer of K3b.
There is one item on the K3b site, however, that many of you will greatly appreciate: step-by-step instructions about how to back up your DVDs as AVI files. K3b makes this process very easy (believe me, I've tried it with other tools, and it can be quite an ordeal). If you want to learn more about this process, read http://www.k3b.org/cgi-bin/index.pl/videoencoding. For details about K3b's DVD-burning capabilities in general, read this post by Sebastian at KDE.news: http://dot.kde.org/1066083247/.
If you want to learn more about burning CDs and DVDs, an excellent and up-to-date resource is Andy McFadden's CD-Recordable FAQ, which you can find at http://www.cdrfaq.org/. For Linux-specific information, see the CD-Writing HOWTO at The Linux Documentation Project, available at http://www.tldp.org/HOWTO/CD-Writing-HOWTO.html. It's several years old, but it still has good stuff in it. Also, the Optical Storage Technology Association (OSTA) has some good information on CD-R/Ws, including explanations of the relevant technology and an extensive glossary. You can find it all starting at http://www.osta.org/technology/cdqa.htm. Another set of definitions, titled "Glossary of CD and DVD Technologies," is available at http://www.cdpage.com/Compact_Disc_Glossary/glossarym.html. It hasn't been updated since 1998, but it's quite complete and still contains a great deal of useful stuff.
If you want to bypass K3b completely and just use the command line, IBM's developerWorks site has a great tutorial at http://www-106.ibm.com/developerworks/linux/library/l-cdburn.html: "Burning CDs on Linux." IBM's site requires free registration, but it's not onerous.
The best way to learn more about K3b is to just play with it. I've barely covered all the cool features this program offers, and more are being added all the time. This is definitely not a moribund project; indeed, it is aggressively developed, with new releases occurring nearly monthly. Keep an eye on K3b—this one's a winner!