
Microsoft finally started bundling support for zipped files directly in Windows XP, but this isn't really a great solution. It only supports the ZIP format, which, while popular, is not the sole format used for compressing files. Further, users of Windows prior to XP are out of luck, and must still download and install a tool for compressing and uncompressing files.
Many Windows users undoubtedly have a copy of WinZip on their machines, as it is the most popular compression tool for that platform. WinZip costs $29, which isn't bad, but free is better. Unfortunately, while WinZip supports the ZIP format beautifully, it supports ARJ, LZH, and ARC formats only with third-party extensions, and RAR isn't supported at all.
7-Zip, on the other hand, is an open source compression tool for Windows. It costs nothing, and it supports a wide variety of formats, including .zip, .cab, .rar, .arj, .gz, .bz2, .tar, .rpm, and .deb, as well as its own .7z format, which it claims provides the best compression of all. If you're looking for a good compression tool for your Windows box, this is a good one to check out.
Installation & Configuration
To download 7-Zip, head over to http://www.7-zip.org. Right on the top of the home page is a link to an installer for the latest version of the software. Download it to your desktop, double-click on the installer, and install it on your machine. It's one of the easiest installs you'll ever do.
Once the program is installed, you need to configure it. On your Start menu will be a new folder inside Programs named, cleverly enough, "7-Zip". Go ahead and select 7-Zip File Manager. When that window opens, select the Tools menu and then Options. The first tab in the "Options" window is labeled System, and it allows you to associate 7-Zip with a wide variety of file formats having to do with compression. My advice is to check all the boxes except cab, deb, and rpm. CAB is used by Microsoft for its installation files, and it's best to just leave that one to the makers of your operating system. DEB and RPM are both Linux formats, and it is highly unlikely that a Windows machine would need to deal with them.

Illustration 1: Associate 7-Zip with all the major compression file formats.
Since this is a Windows machine, ZIP is the format with which you should be most concerned, which 7-Zip definitely supports.
For more information about these extensions and the files associated with them, look at "A note on common compression formats".
Next, select the Plugins tab and then click the Options button found on that tab, which will open the "7-Zip Options" window. We need to integrate 7-Zip into Windows so that our new program will be easier and more convenient to use. My advice is to check every box found on the System tab.
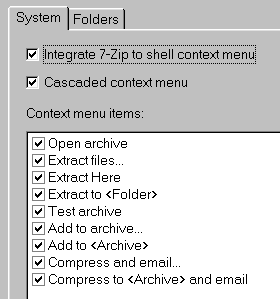
Illustration 2: Integrate 7-Zip into the Windows environment.
The first two checkboxes allow us to easily invoke 7-Zip by just right-clicking on the files and folders we want to compress, while the context menu items give us a wealth of optional activities from which to choose. Select the OK button on the "7-Zip Options" window to close this sub-group of options, and continue.
There's only one more tab that we need to change: Editor. 7-Zip is asking us to choose a simple text editor that will be used to view text files inside compressed archives. Your choice here depends on the text editor you use on your Windows machine. I like vim or emacs on Windows, but a lot of folks use TextPad or NoteTab, if they have those programs installed. If you don't know or don't care, then just use good ol' Notepad. To point 7-Zip at Notepad, click the button labeled "…", and navigate to the Notepad program on your computer. If you're using Windows 95, 98, or ME, you can probably find it at C: WindowsNotepad.exe; if you're using NT, 2000, or XP, it's more than likely at C: WinntNotepad.exe. If you can't locate it, use Find on the Start menu to locate it by searching for "Notepad.exe".
We're done configuring 7-Zip. Click OK to close the "Options" window, and then close the 7-Zip File Manager, and let's start using the program.
Compressing files & folders
Compressing files is really a pretty easy task. Let's say we have a copy of Geoffrey Chaucer's medieval epic The Canterbury Tales, and we want to compress it before sending it to someone via email. The complete poem on my computer is one HTML file, and it is a whopping 1,371 kb (that's almost 1.4 MB) in size, too big to fit on a floppy. Most of my friends are still using dial-up (yes, pity them), and they would be very unhappy with me if I emailed a file that large to them. In addition, many email programs take HTML attachments and display them in the body of the email, as though they were part of the original message, and that would not do at all.
To compress Chaucer's poem, I simply right-click on the file and expand the 7-Zip menu. I get several choices, but for now, let's choose Add to archive….
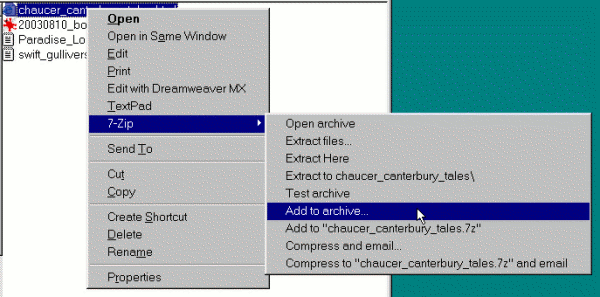
Illustration 3: Compress a file by adding it to an archive.
The "Add to Archive" window now opens. Fortunately, you only need to make the substantive changes here once, as 7-Zip remembers your choices and reuses them each time you go through this process.
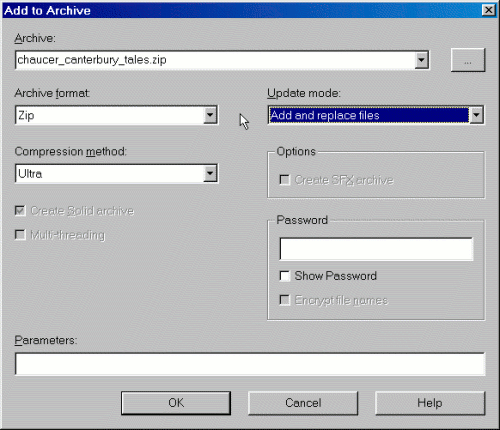
Illustration 4: Set the options governing how 7-Zip handles archives that it creates.
You only need to change two items in this window. First, click the drop-down menu for "Archive format" and select Zip. Since this is the most widely-used compression format on Windows, it's a very safe choice. Second, click the drop-down menu for "Compression method" and select Ultra. This setting governs just how compressed the zipped file is going to be. The higher the compression, the smaller the file, but there is a tradeoff: it takes longer to perform better compression. In these days of multi-gigahertz processors, however, it's not much of a tradeoff anymore, so I recommend choosing the maximum level of compression. You may notice a slightly longer time when creating your archives, but I doubt it. Of course, if you're impatient, and you're using an older, slower machine, you may want to leave the default setting in place, Normal.
If you are sending your archive to a Linux user, it's nice of you to change the "Archive format" to GZip or BZip2. If the recipient uses a Mac, Zip is probably your best option, since 7-Zip doesn't support SIT, the standard format for Mac OS.
You don't have to change the name of the archive itself, as 7-Zip does a good job picking a name for you. But if you want to alter it, go ahead. Just make sure you leave the ".zip" extension on the end if you're creating a ZIP file (and .gz if it's a GZIP file, and so on).
If you want some modest level of security, you can set a password on your archive as well by typing it in the "Password" field. If you want to ensure that you don't type one thing while you think you're typing another, make sure that Show Password is checked.
At this point, press OK and watch as 7-Zip creates your archive by compressing chaucer_canterbury_tales.html. When the process finishes a few seconds later, you still have the original Web page, but you also have a new file sitting next to it, "chaucer_canterbury_tales.zip."
The new ZIP file is 415 kb, a 70% reduction in size over its original 1,371 kb! 415 kb is still a good-sized file, but it's not nearly so bad in email, and it will definitely not be interpolated into the email message as an HTML attachment might.
You might be asking why, when we right-clicked on the Chaucer file, we didn't just choose the Add to "chaucer_canterbury_tales.7z" option listed in Illustration 3. The developers of 7-Zip are proud of their software, and they explain that the 7Z format usually compresses anywhere from 30 to 50% better than the ZIP format when using 7-Zip, and 2 to 10% better than the ZIP format in other similar programs. Unfortunately, other compression programs on Windows (and even other platforms like Mac OS X and Linux) don't support the 7Z format yet, so if you send a file compressed using that format to someone, they will not be able to open it unless they also have 7-Zip. Better to use the ZIP format, which is widely supported on all platforms, and wait to see how 7Z support develops.
If we want to zip up more than one file, simply select all of the files, right-click on one of them, and choose Add to archive…. Likewise, to compress a folder or group of folders, select the relevant items, right-click, and choose Add to archive…. After you do it a couple of times, it gets to be pretty easy.
Uncompressing files & folders
But what about uncompressing a zipped file? Let's say someone emails you a file that ends in ".zip" and you want to view the files and folders contained within it. Save the archive somewhere on your computer, preferably where you plan to place the uncompressed contents of the archive. Then right-click on it and expand the 7-Zip menu.
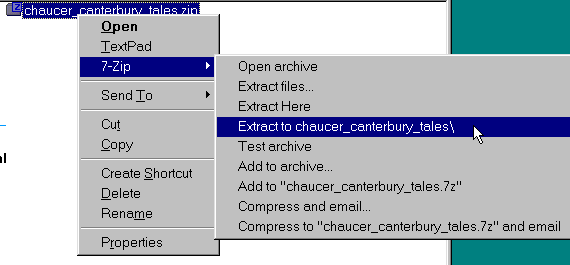
llustration 5: Extract the contents of an archive.
You have a couple of choices. Generally, I recommend the third of the "Extract" options, Extract to name-of-the-archive. Let me explain why by looking at the other two options. Extract files… allows you to choose the location to which you'd like to place the newly extracted files and folders. If you're looking at an archive in one location, and you'd like to grab the files out of the archiveand place them in another location, then choose Extract files…. If you're already in the right spot on your hard drive, then this option isn't necessary. Extract Here does just that: it expands all the files in the archive and deposits them in the folder in which you're currently located. This can cause a problem if the archive consisted of a lot of individual files uncontained in a folder, as you'll now find yourself with a mess. I've found myself with a couple of hundred files littering my Desktop when I mistakenly chose the Extract Here option. Be very careful with that option!
Extract to name-of-the-archive is a nice option because it will extract the files into a folder, even if the original files were not in a folder when they were archived. That way, you're guaranteed not to end up with a mess in a folder or on your Desktop. It's a nice way to keep everything neat.
Further information about 7-Zip
The 7-Zip Web site is located at http://www.7-zip.org. The program is free, but if you register by paying a modest sum, you can get technical support form the developers via email. Registration information, including costs, is available at http://www.7-zip.org/register.html.
7-Zip also has a project page at SourceForge, at http://sourceforge.net/projects/sevenzip/. At the SourceForge site, you can download the program as well as the source code. In addition, there is a forum providing help at http://sourceforge.net/forum/?group_id=14481.