On this page…
The problems with Google Fonts
Using Google Fonts can be problematic. Google wants you to paste something like the following into the <head> of your webpage:
<link href='https://fonts.googleapis.com/css?family=Roboto:400,700,400italic' rel='stylesheet' type='text/css'>
The big problem is that many website visitors will never see your chosen Google Fonts, & that number will only increase. Why? Because people are increasingly turning to ad blockers to reduce the garbage they are forced to download & see, & many (most? almost all?) ad blockers filter out access to third-party fonts by default.
Another problem is that Google serves different fonts to users depending upon their operating systems. Using a Mac? You’ll get a different fonts than the one served to Windows users.
In order to provide a consistent set of fonts to all your users that they can all view, even if they’re using ad blockers, something different needs to be done.
Overview
The following series of instructions will solve the problem. It’s a detailed read, but I’ve tried to break everything down for anyone wanting to use this to serve Google Fonts to their website visitors.
It’s a long read, but really, the basic steps aren’t that difficult:
- Prepare.
- Download all of the fonts from Google Fonts.
- Find the typefaces & fonts you want to use.
- Use Font Squirrel’s Webfont Generator to convert the fonts into a variety of Web-ready formats.
- Integrate the Web-ready fonts into your website.
Please read this whole document carefully.
Preparation
You will need about 1GB of free space on your computer.1
You need to understand the difference between a typeface & a font. In actuality, a typeface is what most people call a font. In other words, Times New Roman, Georgia, Verdana, & even Comic Sans are typefaces. A font is a particular size, weight, and style of a typeface. So Georgia Bold, Georgia Italic, & Georgia Bold Italic are different fonts for the Georgia typeface.
Get Google Fonts
Go to the GitHub page Google created for its fonts.2
Look for a button labeled Download ZIP & press it. Warning: the download will be about 250MB!
Once the download has completed, you are going to expand the ZIP file. Warning: the expanded folder will take up almost 1GB of space!. How you unzip the file depends upon your operating system:
- If you’re using a Mac, go ahead & double-click on the ZIP file. After a good wait, you will have a folder named
fontssitting there. Delete the ZIP file. - If you’re using Windows, do not double-click on the file. Instead, right-click on the file & choose Extract Here (or something similar). If you do not see Extract Here, look for a 7-Zip menu & choose Extract from there. Delete the ZIP file.
Move the new folder someplace permanent, like in Documents.
Find the typefaces you want
Now you need to find the typefaces you want to use. You have several methods for doing this:
- Start looking through the
oflfolder in thefontsfolder. This would be tedious & very time-consuming. Don’t do that. - Go to Google Fonts & use the Filters on the left side of the page to narrow down & find the typefaces & font(s) you want to use.
- Go to a website that has already picked out good Google Fonts & use the suggestions found there.
Once you have your typeface(s) selected, it’s time to see if they will match your needs on your website.
Will the typefaces & fonts work?
Now you have to find out if the typeface you like has the weights & styles (the fonts, in other words; to review, see above) you need. Almost every typeface will have a font called Regular, Book, or Normal. These are all equivalent to a CSS font-weight of 400. Will you need bold (equivalent to a CSS font-weight of 700? Then make sure the typeface you chose has that particular font. How about italics (in HTML, <i> or <em>; in CSS, font-style: italic)? Again, make sure the typeface you like has that font.
Remember, you will likely need at least two typefaces: one for headings, & one for body text. Headings are always bold, so the typeface you choose has to have that font. You won’t need a regular (non-bold) font, but you might need an italic font for titles & such in headings.
For body text, you obviously need a regular font. In addition, you’ll need a bold font & an italic one, for varying types of emphasis. I never recommend getting a font that is both bold and italic, as that is gauche.
So when you look for your fonts, you will probably (probably—your needs may differ!) need the following:
- Body typeface in regular, bold, & italic
- Heading typeface in bold & italic
To find that out, you have two choices: using Google Fonts, or looking manually.
First, you can check on Google Fonts to see how many fonts (Google calls them styles) each typeface provides. For instance, when you initially find Oswald on Google Fonts, you will see this:
 {.img-responsive}
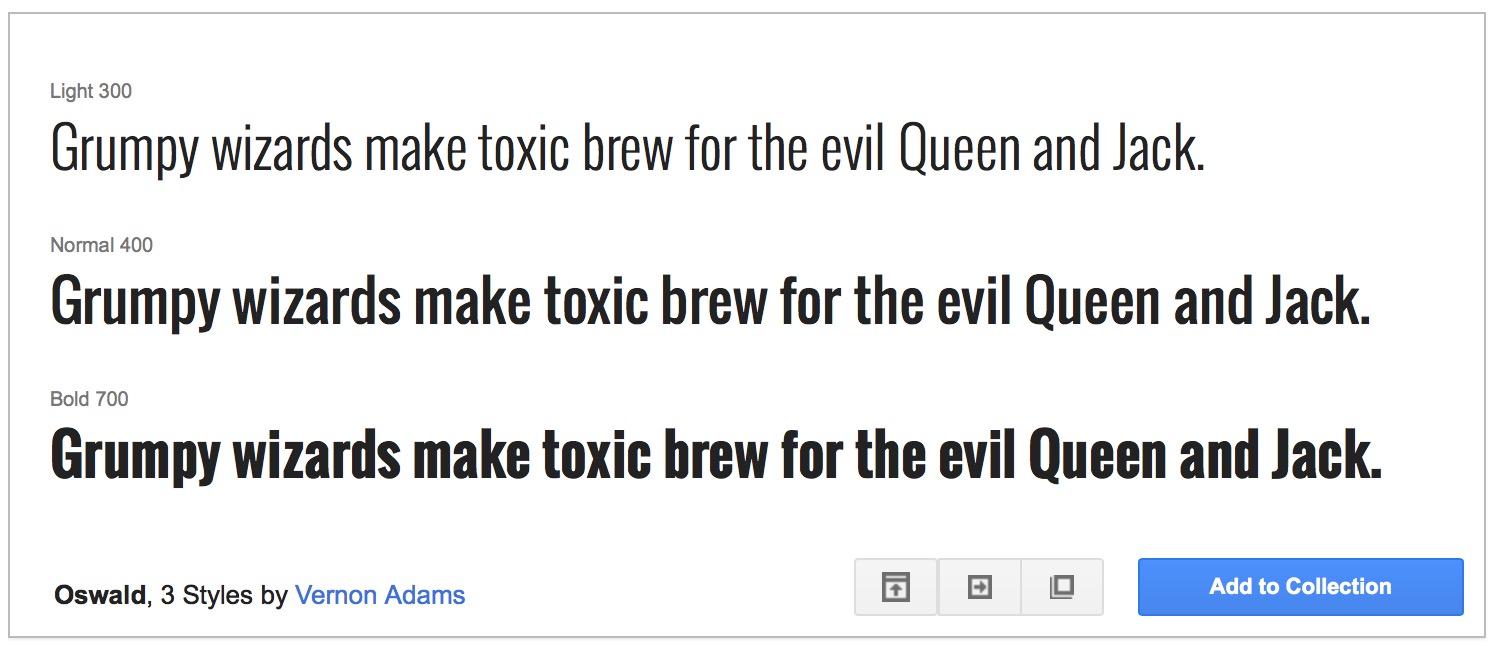
3 fonts (again, Google calls them styles). If you click on the button with a downward-facing arrow inside a box, Google expands the box for Oswald to show you all 3 fonts:
 {.img-responsive}
Uh-oh. The three fonts Oswald provides are Light (300), Normal (400), & Bold (700). No italics. So it’s really not appropriate for your heading font, & probably not for your body font either.3
Let’s try another. Here’s Lora. Google tells us that the typeface provides 4 fonts.
 {.img-responsive}
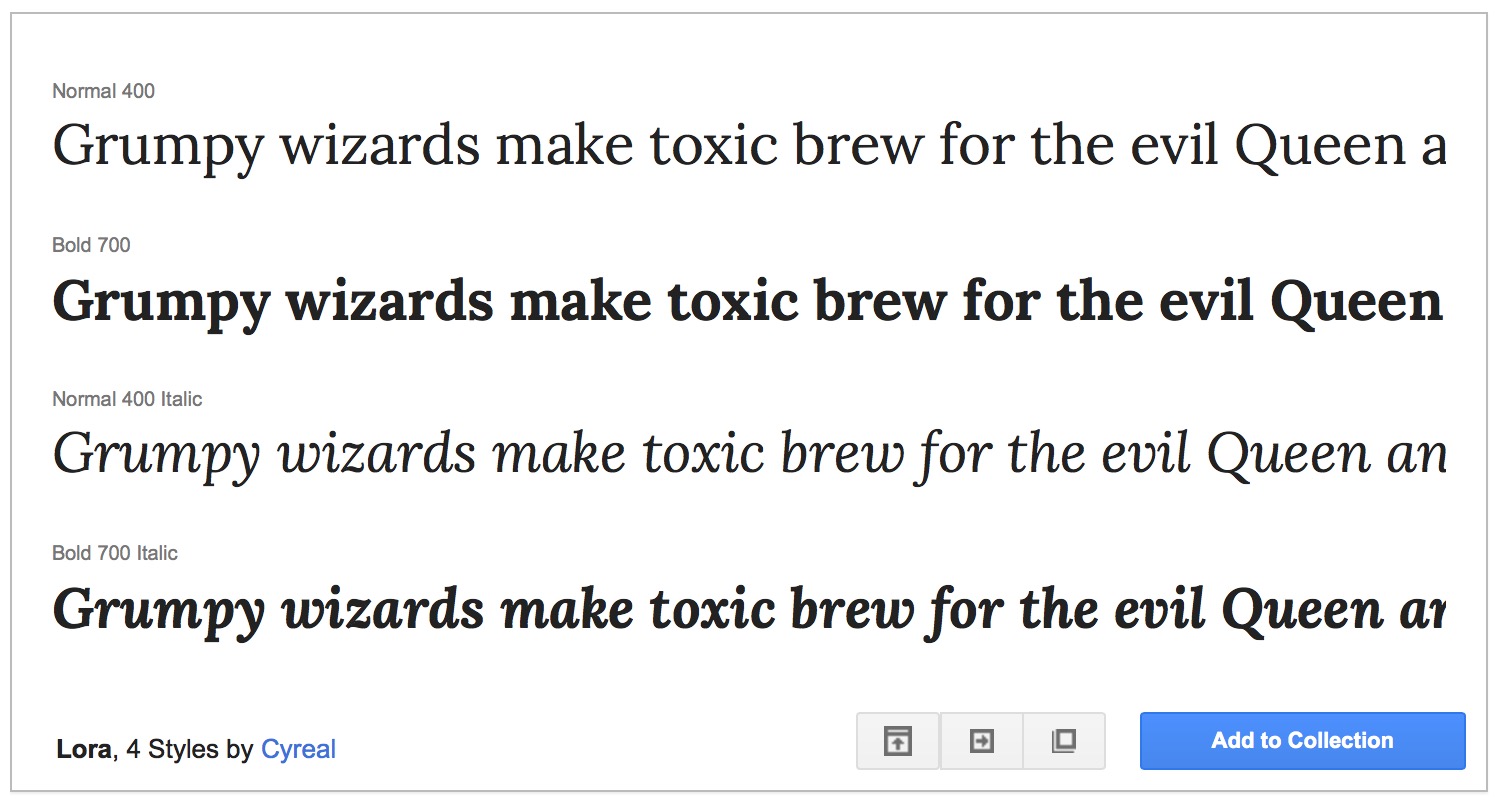
Expand it, & you’ll see all 4 fonts:
 {.img-responsive}
We get Normal (400), Normal Italic, Bold (700), & Bold Italic. Lora will work for both a webpage’s body or headings, so you get some flexibility with it. However, there is no Light (300) font, which you got with Oswald. Tradeoffs! Of course, there are some typefaces at Google Fonts that provide a large number of fonts, such as Raleway (18), Open Sans (10), Lato (10), & Merriweather (8). You just have to look & know what you need.
Second, you can look in the collection of fonts that you downloaded onto your computer. To do the latter, navigate to the fonts folder you unzipped earlier, then into the ofl folder, & finally into the folder for your chosen typeface. Do you see fonts for the weights & styles you want?
For instance, let’s check out how many fonts the Yanone Kaffeesatz typeface provides:
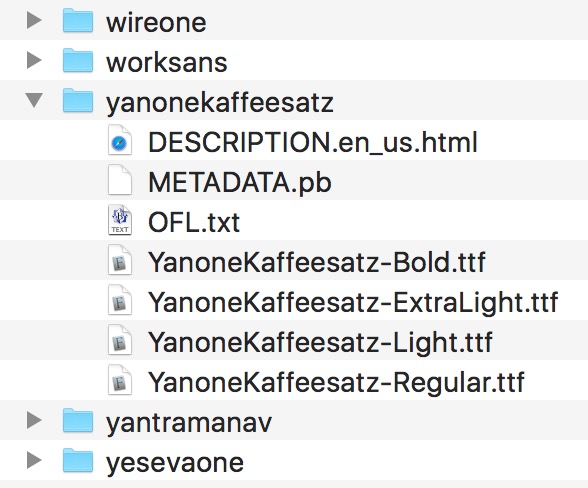
Hmm. Extra Light (200), Light (300), Regular (400), & Bold (700). No italics. Might work, might not—it depends on what you need.
What about Alegreya Sans?
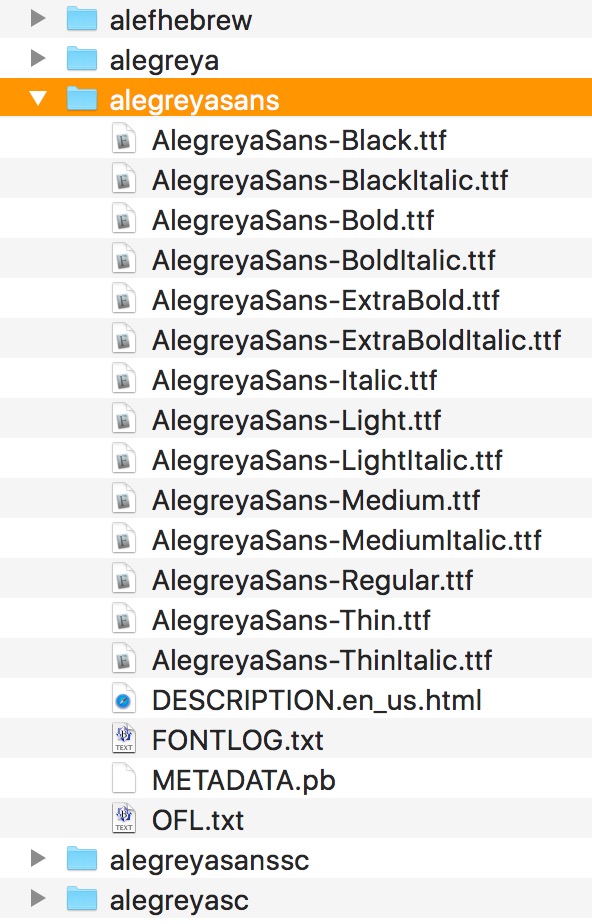
Wow! 14 fonts! Thin (100), Thin Italic, Light (300), Light Italic, Regular (400), Regular Italic (labeled as simply Italic), Medium (500), Medium Italic, Bold (700), Bold Italic, Extra Bold (800), Extra Bold Italic, Black (900), & finally Black Italic. I’d say you’re probably covered in terms of fonts.4
So you’ve picked out your typefaces & you know they have the fonts you want. Now what?
Convert the fonts so they’re Web-ready
Go to Font Squirrel’s Webfont Generator.
Click on the Upload Fonts button. Navigate to the fonts folder you unzipped earlier, then into the ofl folder, & finally into the folder for one of the typefaces you’ve chosen. Choose the fonts you want to use5 & click on Choose (if you use a Mac) or Select (if you use Windows).
If you have more typefaces & fonts you need to convert, repeat the process. Click on Upload Fonts, select the fonts you want, & click on Choose or Select.
Make sure that Optimal is selected.
Make sure you check the box next to “Yes, the fonts I'm uploading are legally eligible for web embedding”.
You should now see something like the following:
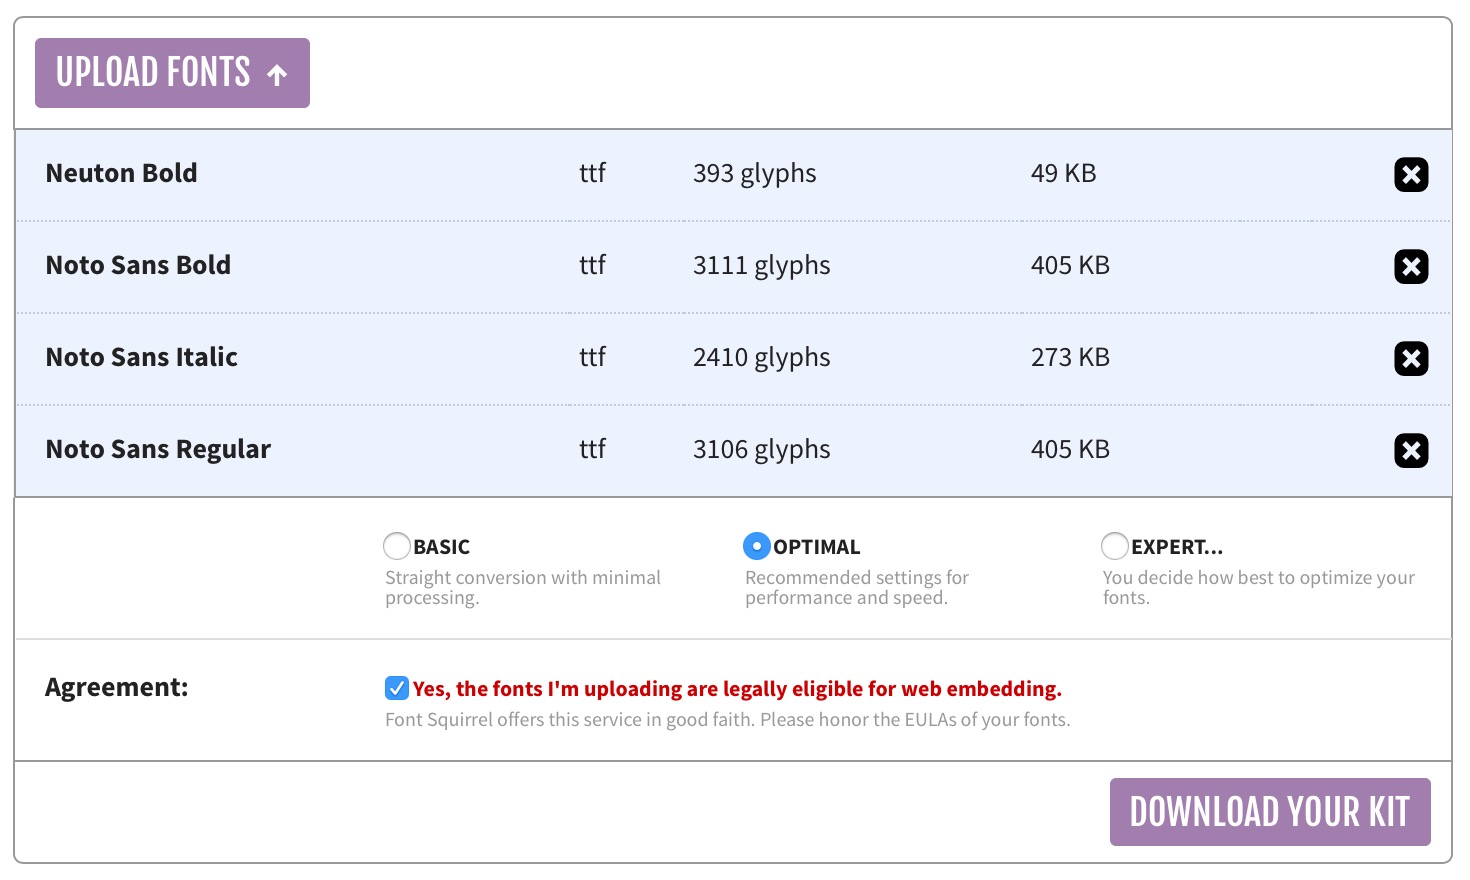 {.img-responsive}
Click on the button that says Download Your Kit. Wait a moment or two while Font Squirrel prepares your download, & then a file will download onto your computer. The file will be named something like webfontkit-20160416-000412.zip. Unzip it using the methods discussed in Get Google Fonts above.
Integrate the Web-ready fonts into your website
When you unzip the download from Font Squirrel, it should look something like this:
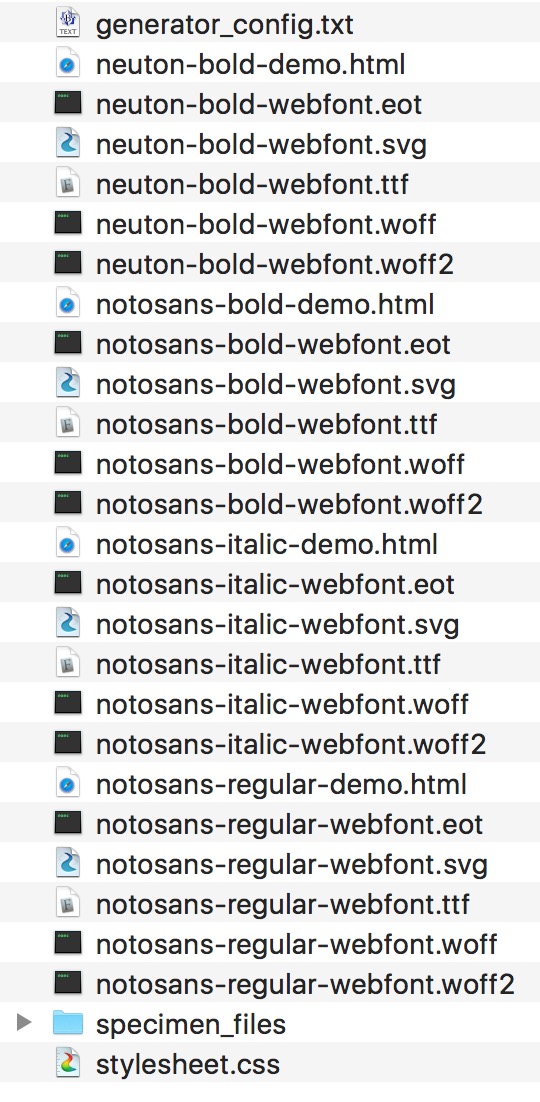
Delete the following:
generator_config.txt- all of the
.htmlfiles6 - the
specimen_filesfolder
Move the fonts (the files ending in eot, svg, ttf, woff, & woff2) into the fonts folder in your Web development project.
Move the stylesheet.css file into the styles folder in your Web development project.
Open your project in Brackets.
Open the stylesheet.css file in Brackets. You’re going to copy the contents of that file into the main.css file in your styles folder, but first you need to prepare it so it works. The problem is that the stylesheet.css file assumes that the fonts are in the same folder as that file. You can tell this by looking at the paths in that file:
url('neuton-bold-webfont.woff') format('woff'),
It should instead be:
url('../fonts/neuton-bold-webfont.woff') format('woff'),
So here’s what you need to do to change those paths. With the stylesheet.css file open in Brackets, go to Find > Replace (or press ⌥⌘F on a Mac or Ctrl+Alt+F on Windows). In the Find field, enter this:
url('
In the Replace field, enter this:
url('../fonts/
Now press Batch. You’ll see the list of changes that Brackets will make at the bottom of the window, something like this:
 {.img-responsive}
Go ahead & press the Replace button, & you should instantly see your changes in the document; e.g., url('../fonts/neuton-bold-webfont.woff') format('woff'),.
There are a lot of extra blank lines in stylesheet.css, so go ahead & remove those.
Once you’re finished preparing stylesheet.css, select all of the content by pressing ⌘A on a Mac or Ctrl+A on Windows. Now copy the contents you selected with ⌘C on a Mac or Ctrl+C on Windows. Select main.css & paste the contents in by pressing ⌘V on a Mac or Ctrl+V on Windows (I always place @font-face rules at the top of my CSS).
Delete stylesheet.css.
Now feel free to use your embedded fonts throughout the rest of your stylesheet.
Questions? Email me at scott@granneman.com.
-
For the best operation of your computer, you should always have at least 10% free space on your hard drive. ↩
-
GitHub is a website on which developers can store their code for others to view, fork, suggest edits, & more. It’s the largest such site in the world. ↩
-
That does not mean that Oswald is useless, not by any means. You could use it for very specific purposes in which you do not need italics—for captions, say, or for specific headings that will never have anything italicized in them. Just keep its limitations in mind. ↩
-
Of course, the typeface could be completely inappropriate. Just because there’s a large number of fonts doesn’t mean you should use the typeface. ↩
-
On a Mac, select multiple files by holding down ⌘ while you click on them. On Windows, select multiple files by holding down Ctrl while you click on them. ↩
-
If you want to load the
.htmlfiles in a Web browser before you delete them, they’re pretty neat—just make sure you don’t delete thespecimen_filesfolder until after you look at them & get rid of the.htmlfiles. ↩
