One of the absolute coolest features in Brackets—one that I wish every other text editor would copy—is called Quick Edit. The best way to understand it is to see it in action.
Preparation
Create a folder named brackets on your Desktop. Into that folder we’re going to create two files.
First create an HTML file named brackets.html that contains the following:
<!DOCTYPE HTML>
<html>
<head>
  <meta charset="UTF-8">
  <title>Brackets Test</title>
  <link rel="stylesheet" href="brackets.css">
</head>
<body>
<h1>Title of Page</h1>
<p>
  Lorem ipsum dolor sit amet, consectetur adipisicing elit, sed do eiusmod tempor incididunt ut labore et dolore magna aliqua. Ut enim ad minim veniam, quis nostrud exercitation ullamco laboris nisi ut aliquip ex ea commodo consequat.
</p>
<p>
  Duis aute irure dolor in reprehenderit in voluptate velit esse cillum dolore eu fugiat nulla pariatur. Excepteur sint occaecat cupidatat non proident, sunt in culpa qui officia deserunt mollit anim id est laborum.
</p>
<ul>
  <li>Lorem ipsum dolor sit amet</li>
  <li>Consectetur adipisicing elit</li>
  <li>Sed do eiusmod tempor</li>
</ul>
</body>
</html>
Now create a CSS file named brackets.css that contains the following:
body {
  font-size: 100%;
  font-family: Georgia, serif;
}

h1 {
  font-family: Verdana, sans-serif;
  font-size: 2em;
}
Now that the files exist, let’s edit them.
Edit already-existing CSS
We open the folder in Brackets by going to File > Open Folder, choosing the brackets folder, & pressing Open.
Select the brackets.html file in Brackets.
Let’s switch the font-family in our CSS so that the body is using sans-serif & the h1 is using a serif. We could edit this in the CSS file, but Brackets makes it faster & easier.
Editing CSS for <body>
In brackets.html, place your cursor in the body element & enable Quick Edit:
- Select Navigate > Quick Edit.
- Press Command+E (Mac) or Ctrl+E (Windows or Linux).
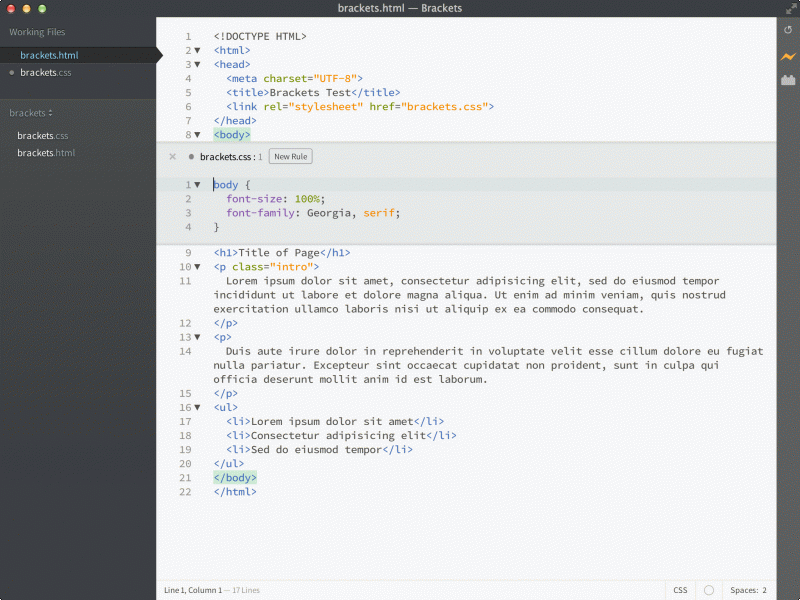
You should see something like the following figure:

Whoa! Did you see that? Brackets grabs the appropriate CSS for the element you’re in & displays it for you! How convenient!
Now let’s edit it. Change font-family: Georgia, serif; to font-family: Verdana, sans-serif; &, if you’re using Live Preview, you can now go to Chrome & see that the fonts in the body are Verdana.
If you’re not using Live Preview (& why aren’t you?), press Command+S (Mac) or Ctrl+S (Windows or Linux) & notice that Brackets saves the CSS file, even though you’re actually in the HTML file!
Press the little x to the left of brackets.css in the Quick Edit panel to close the CSS pane you’re editing (or press Command+E or Ctrl+E), & now you can manually load the HTML file in a browser to see your changes.
Editing CSS for <h1>
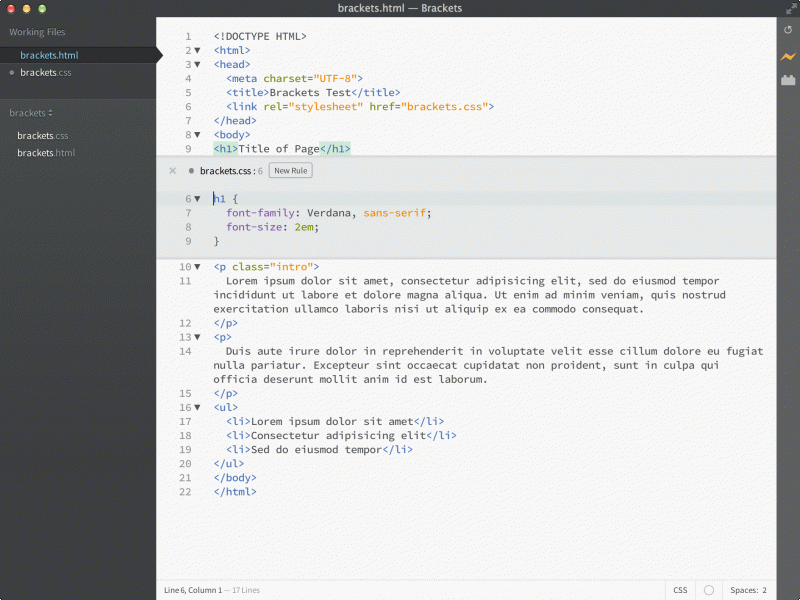
We changed the font-family for the body, but we still need to change it for the h1. Place your cursor in the h1 & enable Quick Edit. You should see something like the following figure:

Change this:
font-family: Verdana, sans-serif;
to this:
font-family: Georgia, serif;
Now check your results, either through Live Preview or through manually reloading brackets.html.
Add new CSS
So far we’ve edited CSS, but we haven’t added new CSS. Normally, in any other text editor, you’d go to the CSS file, add the CSS class or ID there, then go back to the HTML file, & add your class or ID there. Brackets makes this process much more efficient.
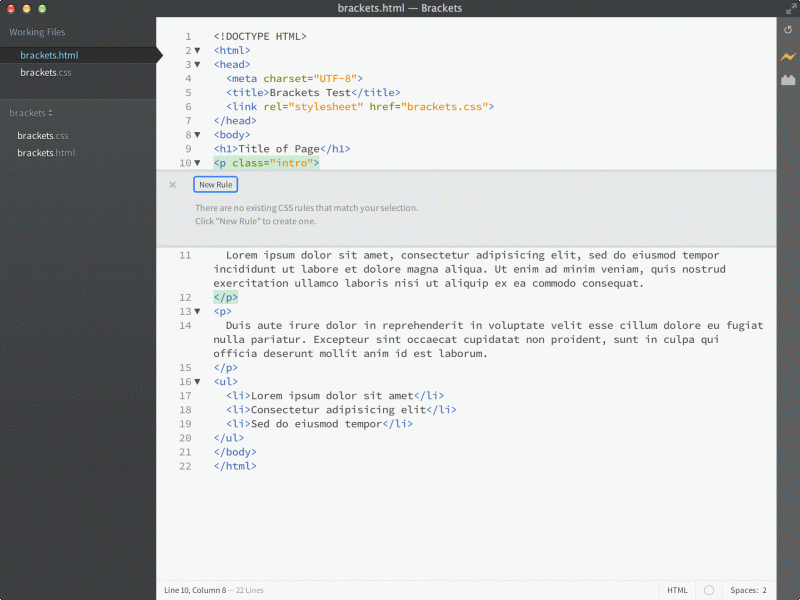
Let’s say we want to change the first <p> & add a class to it to mark it up as the introductory paragraph. In the HTML file, put your cursor between the p & the > & then type in class="intro", so that it now says <p class="intro">. Now enable Quick Edit, & you should see something like the following figure:

Brackets lets you know that it can’t find any CSS that corresponds to your selector, so it invites you to create a new CSS rule. Let’s do just that.
Click on the New Rule button, & notice that Brackets is smart enough to know what class you’re adding & prepare your CSS selector for you:
.intro {

}
This is amazingly helpful. Now add your properties & selectors so that it looks like the following:
.intro {
  font-size: 1.2em;
}
Now check your results, either through Live Preview or through manually reloading brackets.html.
Note also that while you’re creating the CSS for the .introclass, you can also add further CSS blocks as well. Position your cursor after the } & press Enter twice. Now type in the following:
.intro:first-line {
  font-weight: 600;
}
Check your results in your browser. Very nice!
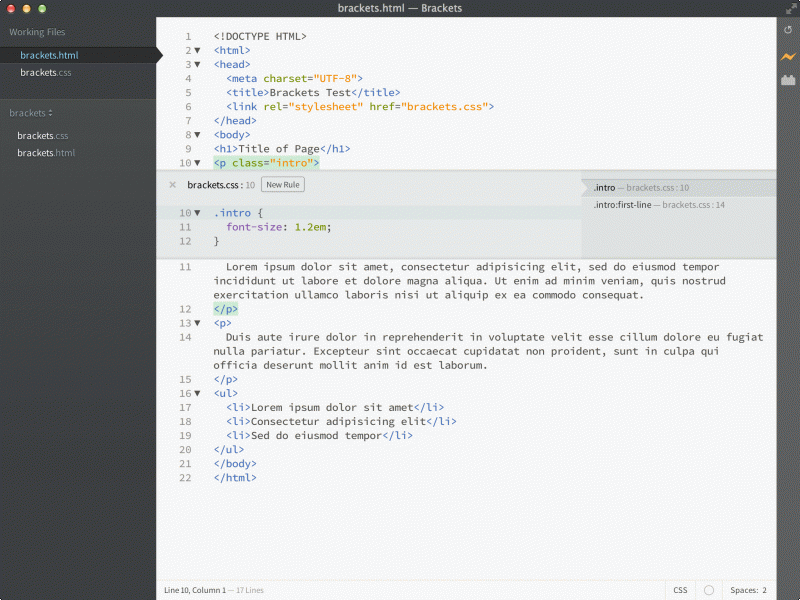
Now, press the little x to the left of brackets.css in the Quick Edit panel to close the CSS pane you’re editing (or press Command+E or Ctrl+E). Keep your cursor positioned somewhere inside <p class="intro"> & open Quick Edit again by using the menus or the key command. Notice that Brackets gives you a choice as to which CSS block you can edit, as you can see in the following figure:

On the right of the CSS pane, you can see that Brackets has detected that two CSS blocks refer back to the selectors that your cursor in in: .intro & .intro:first-line. In a nice touch, Brackets also tells you the line numbers in the CSS file that refer to those CSS blocks. Click on either one & you can edit to your heart’s content.
So now you know how to add new CSS, something that Brackets makes really easy.
